In the springtime, our bodies naturally want to start detoxing to “clean out” all of the gunk that we’ve stored up over the winter (which was pretty brutal this year!).
Wastes and toxins build up in our bodies from stress, processed and refined foods, sugar, fried foods, chemical additives, and pesticides. That is just one of the reasons we often feel tired and sluggish, hold on to extra weight (toxic tissue is a fat storage hog!), and don’t radiate health in the way we look.
Fortunately, this salad contains a bunch of ingredients that naturally promote the elimination of wastes and toxins. Check out all of the detoxifying ingredients!
This is a great dish to bring to a potluck or cookout. You can even make it the night before and store it in the fridge to let all of the flavors come together!
I went to one of my best friend’s birthday parties a few weeks ago (yay for turning 30!) and brought this salad with me. I doubled the recipe for the party, and it made enough for a group of 50 people. It was a HIT!
Refreshing Quinoa Salad with Apples & Almonds
Bring this to your next potluck or cookout or make it for your family!
1 cup peeled, diced tart apple, such as Granny Smith
1 cup finely chopped celery
1/3 cup golden raisins (you can use regular raisins if you can’t find golden ones :))
1/4 cup finely chopped parsley
1/4 cup of thinly sliced green onions/scallions*
1/2 cup coarsely chopped almonds, toasted
Coarse salt and pepper
*I added about 1/4 cup of thinly sliced green onions/scallions to the original salad recipe, since they are in season and add another dimension of flavor. They are also detoxifying and an anti-cancer GBOMBS food!
Asparagus is in season, so I couldn’t wait to make one of my favorite, super simple springtime recipes starring this beauty detox vegetable. Check out all the cool things asparagus helps your body do!
Create the proper electrolyte balance (and reduce puffiness) because of its potassium content
Cleanse the digestive system and get rid of toxins because of its high fiber content
Better absorb calcium
Prevent urinary tract infections and kidney stones
To prep asparagus spears, you’ll first need to snap off the “tough” bottom part. Hold the spear with both hands and bend until the bottom snaps off. It will naturally break off where the tender portion ends and the tough, woody part begins. Use one spear as a guide for where to cut the rest of the bunch.
One of the tastiest ways to prepare asparagus is to roast it, but I also enjoy it in salads and soups. If you prefer, you could grill this recipe, too!
Toss asparagus in the oil and sprinkle with sea salt and pepper. Place stalks on a foil-lined baking sheet, so they’re not touching, and roast for 8-10 minutes. (Well-cooked spears are tender when pierced with a fork but still bright green in color. Be careful not to overcook. We don’t want limp and dull green asparagus!)
Remove the asparagus from the oven and dust with lemon zest. Add more salt and pepper to taste.
Squeeze a little lemon juice on top for extra flavor, and top with toasted almond slices for some crunch!
Is it your first time trying asparagus? You might notice that your pee smells funny when you go to the bathroom after eating asparagus, but that’s totally normal!
Growing up, I LOVED pasta, especially angel hair pasta. I ate it multiple times a week with butter, garlic powder and heaps of parmesan cheese. It was my go to meal, even in college.
Since removing gluten from my diet a few years ago, I’ve tried alternatives like lentil and brown rice pasta (that are delish!), but sometimes I want something even lighter.
If you’re looking for some creative alternatives to pasta that are packed with nutrients, won’t weight you down and are perfect for warmer weather, you have to try…zucchini noodles.
AKA Zoodles!
Meet, the spiralizer. This gadget will open a whole new world of food possibilities for you. You can use it with zucchini, carrots, beets, cabbage, and a range of other fruits and veggies. Better yet, if you have kids and you’re trying to introduce them to certain veggies, let them use this gadget and I bet they will be a little more tempted to try what they spiralize!
I’ve included a video below for how to use it.
Zucchini noodles are a great alternative to pasta because they don’t spike our blood sugar or contain gluten like most pasta. You’ll be AMAZED at how similar the texture is to pasta…you can still twirl it on your fork, too!
Here’s the fun part…spiralize the zucchini! Watch the video below to learn how. (Then, cut the the strands in chunks with scissors, otherwise you will end up with one very long strand of pasta!)
To make the pesto, put the red pepper, walnuts, garlic, and sea salt in a food processor (we used a mini one), and pulse until blended but still a bit chunky.
Top the zucchini pasta with one or two spoonfuls of pesto and some paleo parmesan cheeze and enjoy!
Aside from being delicious, the best part about this recipe is that you can whip it up in 10 minutes!
It’s simple, flavorful, and really good for you.
I just started cooking with broccolini in the past few months and really love it! The stalks are thinner than broccoli, so I find that I’m able to eat the whole stalk, which means less food is wasted.
Making this dish also gave us an excuse to keep using our perfectly paleo parmesan cheeze – we couldn’t stop eating it!
Maybe you’ve tried it before, maybe you haven’t. Either way, you know you don’t like it, and there’s no way anyone can get you to try it…right?
Until about 4 years ago, guacamole was one of those foods for me. Why? Because I was CONVINCED that guacamole had mayonnaise in it…and I’ve always disliked mayonnaise.
One day at work, we had a healthy cooking demo taught by a health coach like me, and we were learning to make none other than…guacamole! I had all but made up my mind that I wasn’t going to try it.
Fortunately, it didn’t take long before I realized that it was NOT made with mayonnaise and that everyone else was trying it, so…
I gave in to peer pressure and was shocked to find out I LOVED IT!
What had I been missing??
Ever since that day, I’ve been an avocado and guacamole lover.
Delicious, fresh, and seasonal ingredients for this delicious guac!
Avocados are one of the healthiest foods you can eat AND are known as a beauty detox food. Here are just a few of their awesome health benefits:
Heart-healthy monounsaturated fats, vitamins and minerals promote moisturizing from the inside, which means healthy, smooth, radiant skin (a true beauty food!)
The healthy fat helps our bodies better absorb antioxidants from other fruits and veggies
The antioxidant they contain – glutathione – is a powerful cancer-fighter
The combo of good fat and fiber helps control blood sugar
My favorite ways to use avocados are in dips, soups, desserts, mixed in to salads, and (of course!) in guacamole. I found a super simple recipe that used a slightly different combo of ingredients than the usual ones, so I thought I would test it out.
Two of the other ingredients in this guac – cilantro and scallions (AKA green onions) – are also great for you. Cilantro helps the body detoxify and onions are one of the top anti-cancer GBOMBS foods, so enjoy them all you want!
1 tablespoon FRESH lime juice (don’t sub the bottled kind)
3-4 tablespoons green onions, thinly sliced (also called scallions)
2 tablespoons fresh cilantro, finely chopped
1/2 teaspoon sea salt (add more to taste)
fresh ground black pepper, to taste
Optional: 1/2 ripe tomato, seeds and pulp removed, chopped
Directions
In a medium bowl, combine all the ingredients and mash with a fork or potato masher until you reach your desired consistency. We like ours to be a bit chunky, so we don’t mash it too much.
We love dipping fresh veggies like carrots, cucumber, celery, red peppers, and sugar snap peas into our guac, along with these tortilla chips!
Broccoli with non-dairy “snow” sprinkled on top. Yum!
When I found out that dairy products were triggering a lot of the health issues that had plagued me since childhood, I started to give them up little by little. I had been eating foods that I thought were good for me my whole life that had actually been harming me.
The more I cut out, the better I felt. It seemed like a miracle!
The last two foods I took out of my diet (after much resistance!) were yogurt…and my beloved Parmesan cheese.
Pasta, pizza, zucchini, ravioli, Beefaroni, zucchini, summer squash, and broccoli all tasted infinitely better when covered with a generous coating of Parmesan cheese.
I used it so often, I didn’t know how I would live without it and struggled to find alternatives that were even remotely comparable. Fortunately I’ve found a recipe thatlooks and feels just like it and tastes “cheesy” enough to satisfy! It’s considered paleo, too, because it doesn’t contain any dairy. (I don’t follow the paleo diet exclusively, but whenever I’m looking for recipes, I use it as part of my search since paleo automatically means it’s dairy and gluten free.)
The best part? It’s one of the easiest recipes I’ve made andhas only 3 ingredients 🙂 Hooray for simplicity!
1 cup unsalted cashews (Trader Joe’s has the cheapest!)
1 teaspoon sea salt
Mix it in a food processor until it is the texture of Parmesan cheese. Sprinkle it on cooked veggies, salads, pasta, or on anything else you’d normally use Parmesan cheese. I used it on sauteed broccolini with tomatoes and garlic the other day and on my salads throughout the week, and it was so good! YUM!
With the weather finally resembling spring and the temps hitting almost 80 degrees today (yay!), I was inspired to share a new recipe for a deliciously decadent summertime (or anytime!) treat…
Fudgesicles!
I remember buying 18-count boxes of fudge pops when I graduated from college and enjoying them every day. Since they were a low-calorie AND sugar-free treat, I thought I was making a healthy choice!
Yum! Homemade fudgesicles!
Out of curiosity, I looked up the ingredient list for Popsicles Sugar Free Fudgesicles, and this is what I found:
Really? Do we need over 20 ingredients in a fudgesicle?? I don’t even know what half of those things are, but I’m pretty sure I don’t need them in my body.
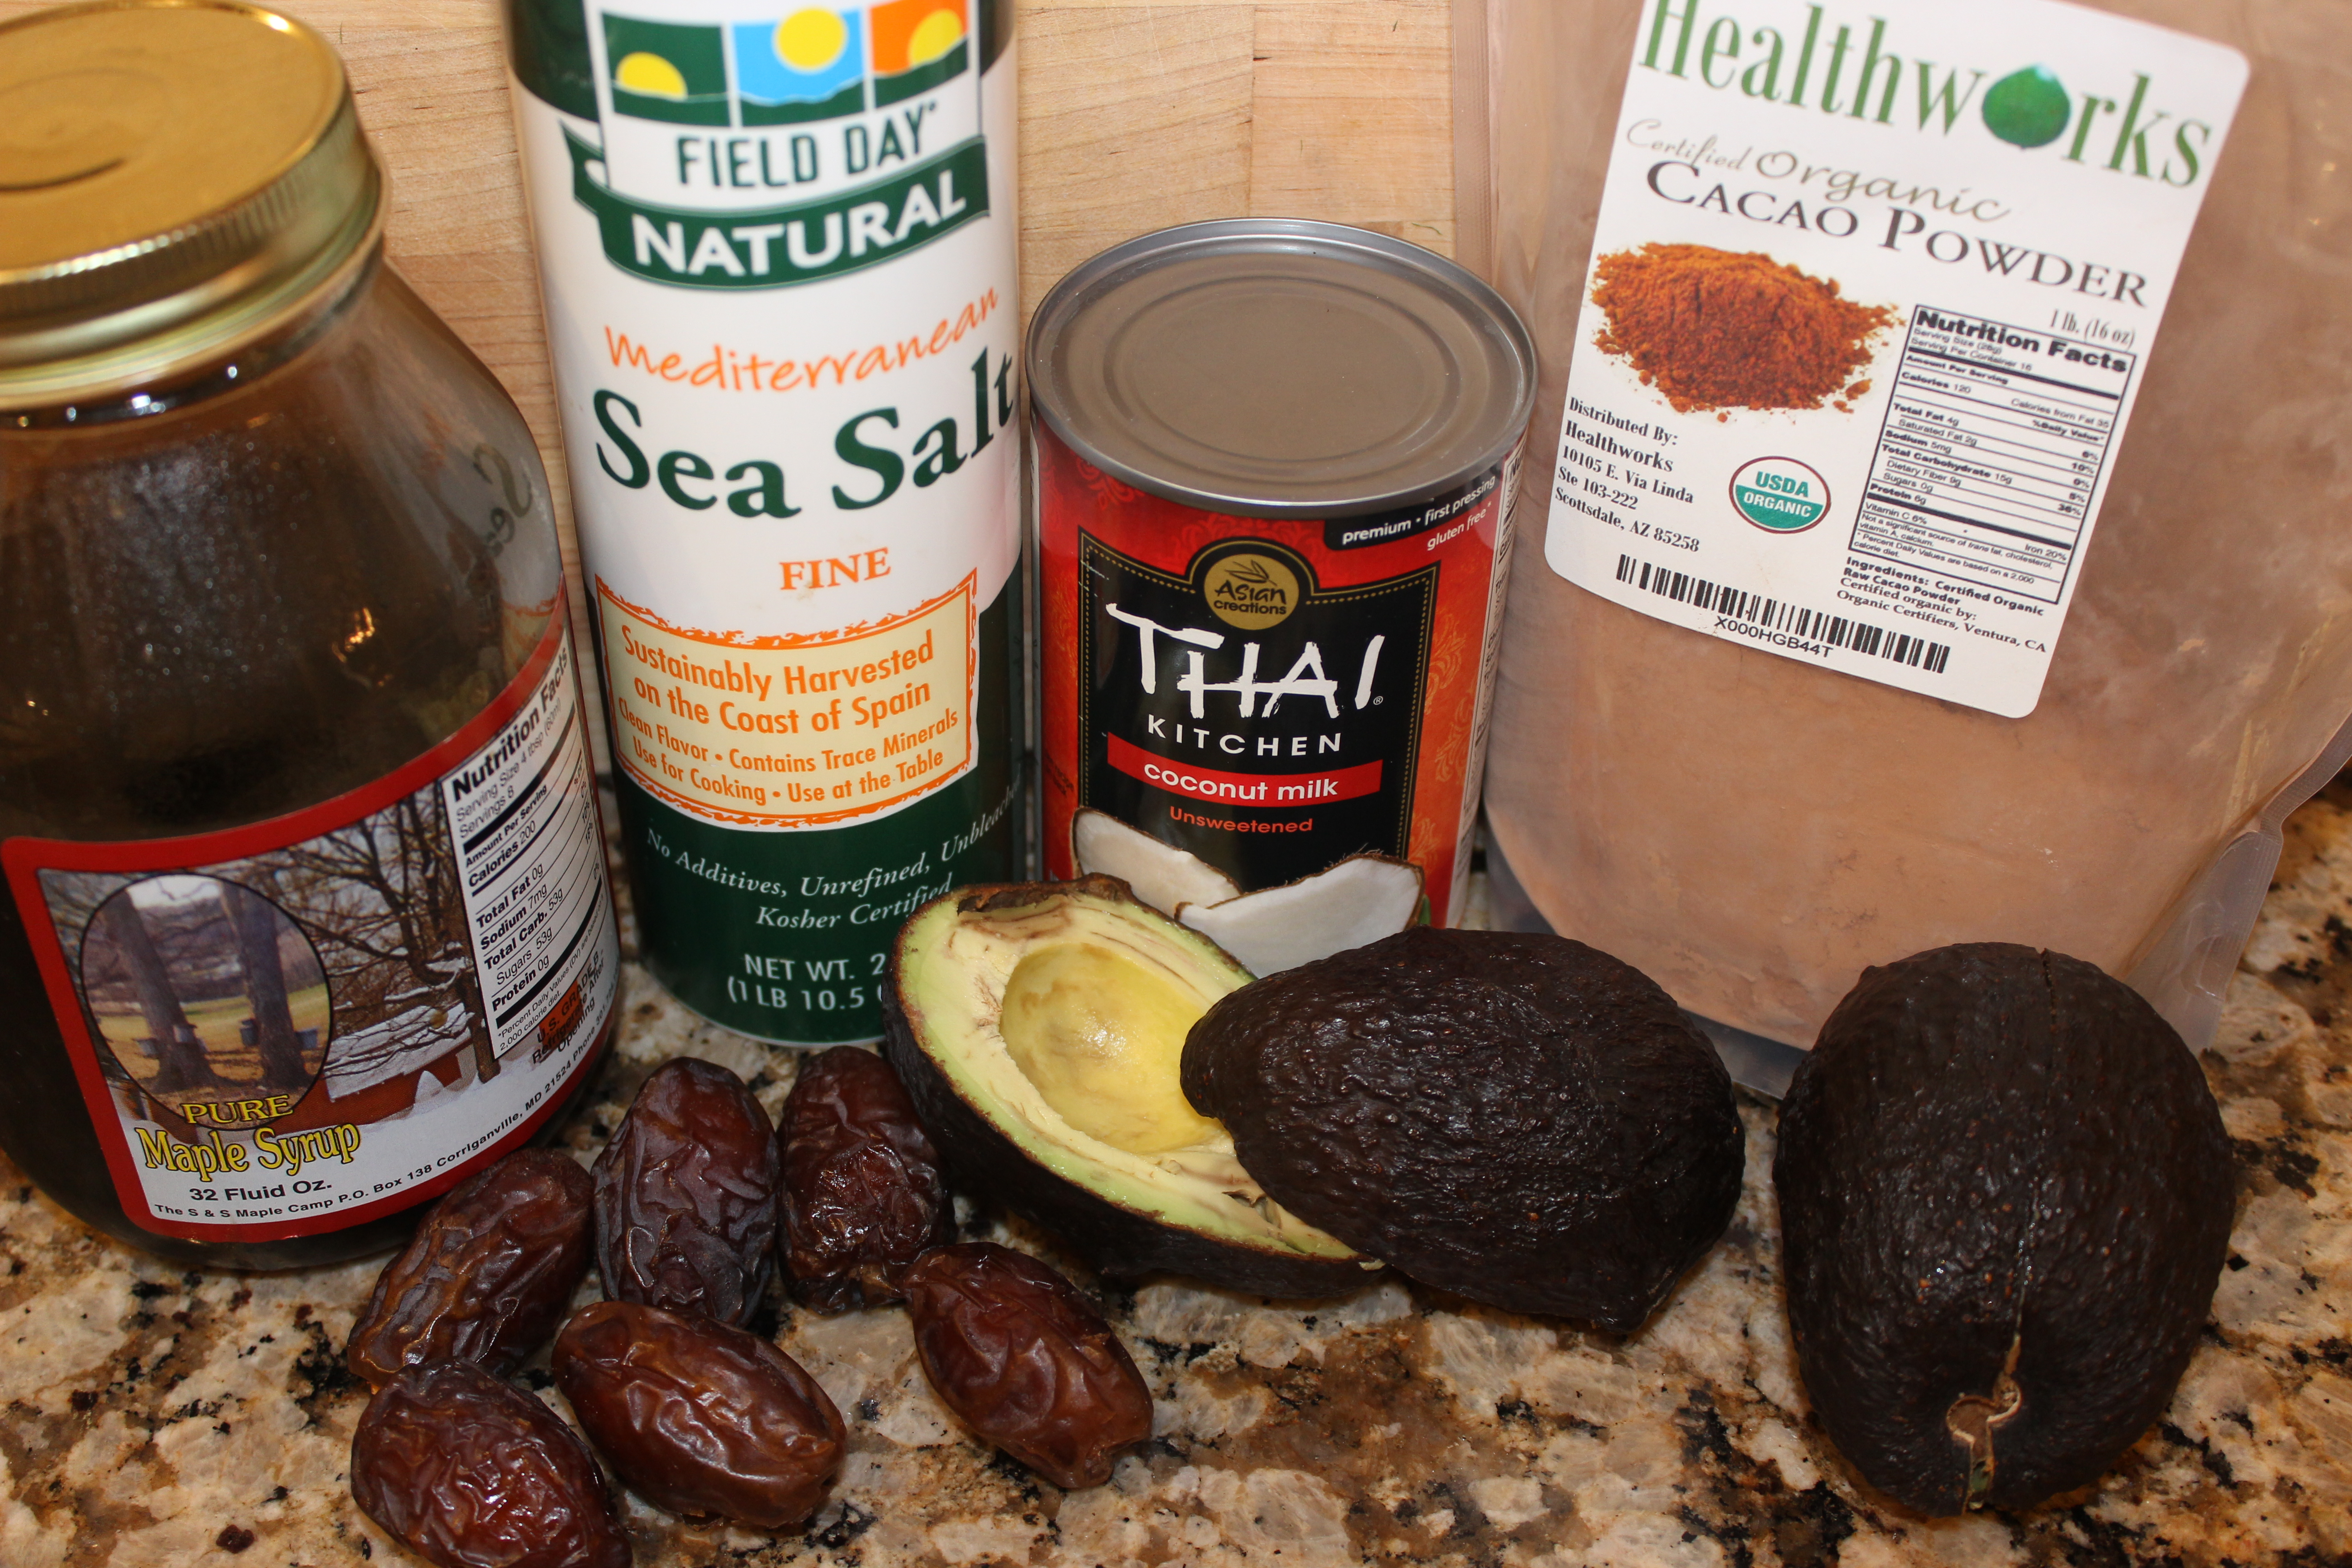
I’m excited to share this recipe because it’s 2-in-1. The same recipe that makes fudgesicles ALSO makes creamy chocolate pudding if you leave it unfrozen. How cool is that?
This recipe is dairy-free and doesn’t contain any refined sugar (or the laundry list of chemicals in the store-bought kind!), and it results in a rich taste and creamy melt-in-your-mouth texture because of the avocado and coconut milk.
Bill and I and two friends tried these for the first time the other day, and we couldn’t tell the difference between these and the “real thing!”
1 cup canned coconut milk (or other non-dairy milk) – I used full fat coconut milk to make these nice and rich. You can find the coconut milk at any grocery store, often in the international aisle. I use this kind.
It’ll be worth the read to get to this dairy-free noocho cheese recipe at the end!
One of the reasons a lot of us don’t take the time to cook or try out new recipes is because we are afraid of failing, fearful that we will “mess it up” and that it will have been a waste of money on food.
We’ve all been there, right?
I often experiment with recipes I’ve never made before and ingredients I’ve never used. I learn what I like through trial and error and take the “will this really taste good?” guesswork out of it for you 🙂
As I continue to focus on a dairy-free lifestyle because of how much better I feel eating this way, I’m sometimes challenged to find comparable alternatives to dairy-based favorites.
In my last post, I shared one of the key ingredients I now use in my cooking to impart some “cheesy” flavor. I promised that one of the recipes I would share with you would be a dairy-free nacho cheese sauce (AKA “noocho” cheese, since nutritional yeast or “nooch” is what gives it its “cheesy” taste).
Most of the time when I prepare new recipes, they turn out great and taste delicious, and I can’t wait to share them with friends and family.
Not-so-nacho cheese…first recipe attempted – won’t be making this one again!
It lacked flavor, and no matter what I added or even if I heated it up on the stove, I couldn’t get it to taste right…and it definitely didn’t resemble nacho cheese.
Fortunately, using a recipe from this cookbook, noocho cheese attempt #2 was a HIT!
Bill and I made it on Friday night and brought it to a friend’s house as an appetizer, and they liked it, too. Check out the recipe below. You will not regret making this stuff! 🙂
The Ultimate “Noocho” Cheese Sauce
Yum Yum Cheesy Goodness!
Ingredients*
1/2 cup raw cashews, soaked in water for at least 30 minutes and then rinsed (Trader Joe’s has the cheapest)
We served it with our favorite healthier chips, which I will share more about in my next post! I enjoyed some leftover sauce the next day with baby carrots. You have to try this!
*There’s a good chance that a couple of things in this recipe aren’t already in your pantry…don’t let that stop you! Ordering online at Amazon or Vitacost is super easy, or you can pick them up the next time you’re at the store.
If you don’t know where to find something, ask. I’ve found that people are happy to help!
Tahini (find in the international section of most grocery stores, in any natural food store, or online.)
Roasted red peppers (sold in glass jars in the non-refrigerated section of the grocery store)
Nutritional yeast (you can buy this online at Amazon, Vitacost or other retailers, or at any natural food store, Wegmans, Whole Foods, MOMs, or Roots)
This has been one of the most read posts on my blog. I’ve summarized most of it in this video, so feel free to check it out and read below for the full “concoction” recipe and links to learn more.
Sometimes the scientific evidence for something is lacking but anecdotal evidence is strong. That’s the case with what I’m about to share. You’re going to have a hard time finding someone who is going to be eager to fund research about the health benefits of a natural product like raw apple cider vinegar (ACV).
Why?
No one stands to benefit financially, which is the opposite of what happens in the case of pharmaceutical research when drug companies benefit.
I swear by ACV as a “cold kicker” and immune booster, which is largely anecdotal but is supported by the experiences of my family, friends, peers and others online.
“Lack of proof isn’t proof that something isn’t happening.”
The research on the benefits of apple cider that has been done is promising in the area of helping us control our blood sugar and keep us feeling satiated. Controlling blood sugar isn’t just something that concerns diabetics. When we control our blood sugar, we get off the mood and energy roller coaster and we feel fuller and satisfied longer, which may lead to eating less overall.
Apple cider vinegarhelps stabilize our blood sugar by slowing what is known as “gastric emptying,” or the rate at which food leaves our stomach. If it takes longer for food to exit our stomach, we will feel fuller longer!
Not only that, but the main substance in apple cider vinegar is acetic acid, and it has been found to kill bacteria and prevent bacterial growth. This is one of the reasons, in addition to its digestive supportive properties, that ACV is often implicated as an immune booster. Anything that supports digestive health, boosts our overall health and well-being.
Using just any apple cider vinegar won’t provide all of the benefits. In this case, the type and brand really do matter. The ACV that I swear by that you can now find at just about any grocery store, every health food store, and online, is Bragg’s Raw Unfiltered Apple Cider Vinegar with “The Mother.”
Bragg’s Raw, Unfiltered Apple Cider Vinegar with “The Mother” – this is the bottle to buy!
Regular apple cider vinegar is clearer and kind of looks like apple juice; it’s been filtered. The good stuff (Bragg’s) contains some cobweb-like stuff at the bottom of the bottle called “The Mother,” which is made up of raw enzymes and bacteria that promote digestive health, as they feed the good bacteria in our gut.
I started using this stuff about two years ago when I first came off of the acid reflux medication I had been taking for almost 10 years. Since then, I’ve been using it as the base for an energizing morning drink and whenever I start to feel like I’m coming down with something. I also love using it in salad dressings and to add flavor to a pan of sauteed greens.
My dad – a 67-year-old, 6-time Ironman triathlete – swears by it and calls it “the concoction.”
My Ironman dad swears by Bragg’s apple cider vinegar and “the concoction”
The moment he feels a tickle in his throat or a cold coming on, he throws back one of these drinks (recipe below) and says it prevents his symptoms from progressing! My husband and I do the same thing, and it really does work for us. While there is no research in the scientific literature to support those claims, we’re not the only people experiencing them. Bragg’s has a list of customer testimonials on their website.
The “concoction” doesn’t taste amazing, but chances are, you’ve at least had a shot of something that didn’t taste great but drank it anyway, right? Try it for a week or two each morning and see if you notice a difference.
There isn’t an exact science to the recommended amount to drink, but two teaspoons seems to be the magic number.
*Because the acidity of the lemon juice and vinegar can potentially soften tooth enamel ALWAYS make sure you drink this with a straw AND rinse/swish your mouth with plain water after drinking it and BEFORE brushing your teeth.*
This is not intended to be medical advice. If you have questions or concerns about using apple cider vinegar or are currently taking medication to control blood sugar or insulin levels or stomach ulcers, talk with a naturopathic or functional medicine practitioner, which you can find here and here.
Pink Apple Cider Vinegar Drink
Try this drink before meals to stimulate your digestive system!
1-2 cups water (room temperature)
2 teaspoons raw apple cider vinegar (Bragg's brand with "the mother")
To protect your teeth, drink this with a straw. You can find fun glass straws here.
Alwaysdilute ACV with water and avoid brushing your teeth immediately afterwards, so you’re not scrubbing the acid into your teeth. Rinse your mouth with plain water after drinking this as an additional protective step.
Ingredients for “the concoction”
Have you used ACV before? Feel free to share how you like to you use it in the comments below!
I love peanut butter and chocolate…especially when they’re together.
It’s pretty tempting to take a spoon right to the jar, isn’t it? I’d be lying if I said I didn’t do that at least once a week 🙂
Have you ever had those crunchy chocolate-covered peanut butter balls made with Rice Krispies? The recipe usually calls for a cup of refined sugar, margarine and vegetable shortening. That combo is an inflammation nightmare for your body! I wanted to find a healthier alternative that still had a similar flavor and texture but without all the not-so-good-for-us ingredients.
The combination of crunchy rice cereal, creamy peanut butter, sweet maple syrup and chocolate means these little bites won’t last long. Bring them to a party or just make them for your friends and family. They’re definitely a crowd pleaser!
Chocolate Peanut Butter Bliss Balls
Ingredients for these bites of pure peanut butter bliss!
Ingredients
1 cup 100% natural peanut butter (smooth or crunchy)
We use cookies to analyze traffic and improve your experience. Just wanted to let you know! Learn more about cookies and similar technologies here Okay, Got It!Read More
Privacy & Cookies Policy
Privacy Overview
This website uses cookies to improve your experience while you navigate through the website. Out of these, the cookies that are categorized as necessary are stored on your browser as they are essential for the working of basic functionalities of the website. We also use third-party cookies that help us analyze and understand how you use this website. These cookies will be stored in your browser only with your consent. You also have the option to opt-out of these cookies. But opting out of some of these cookies may affect your browsing experience.
Necessary cookies are absolutely essential for the website to function properly. This category only includes cookies that ensures basic functionalities and security features of the website. These cookies do not store any personal information.
Any cookies that may not be particularly necessary for the website to function and is used specifically to collect user personal data via analytics, ads, other embedded contents are termed as non-necessary cookies. It is mandatory to procure user consent prior to running these cookies on your website.