Notice: Function _load_textdomain_just_in_time was called incorrectly. Translation loading for the social_sharing domain was triggered too early. This is usually an indicator for some code in the plugin or theme running too early. Translations should be loaded at the init action or later. Please see Debugging in WordPress for more information. (This message was added in version 6.7.0.) in /var/www/wp-includes/functions.php on line 6114
cauliflower Archives · Rachel's Nourishing Kitchen

Tag: cauliflower

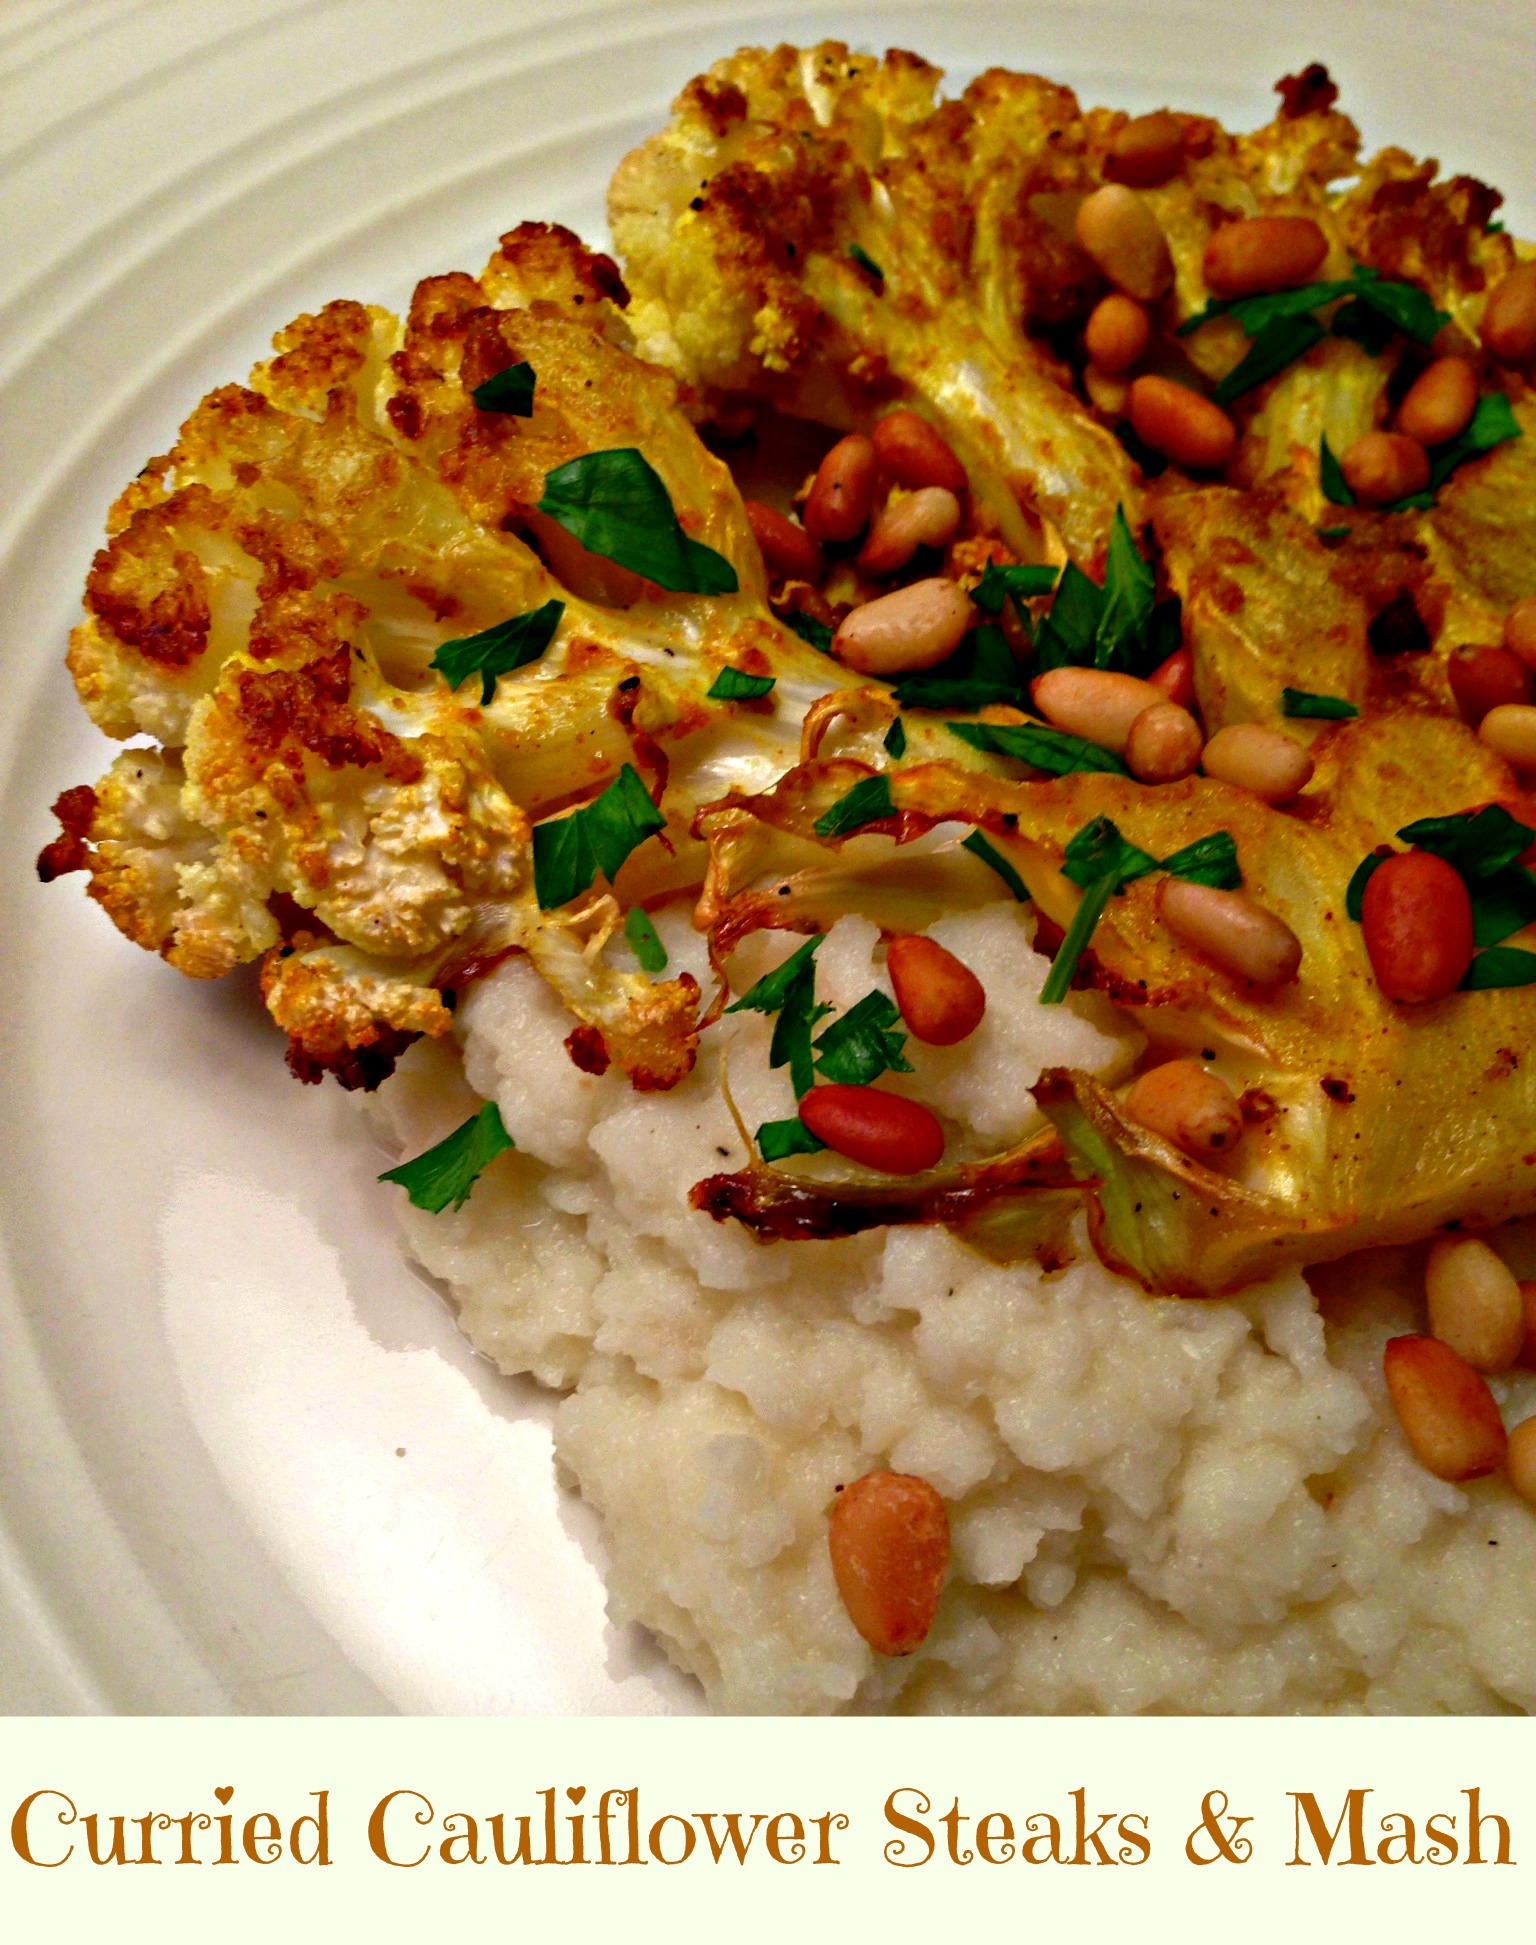
Fancy Pants Curried Cauliflower Steaks & Mash {Paleo, Vegan}

When it comes to eating well, one of the key things we’re told to do is “eat the rainbow” and include a variety of brightly colored foods in our diet.

I totally agree, but the unfortunate part is that advice leaves out foods that are well…white and colorless.

Like cauliflower.

Cauliflower doesn’t get nearly as much love as its green buddy broccoli, but it should!

It’s just one of the many health-boosting, inflammation-fighting, detoxifying foods in this recipe.

cauli closeup

I was inspired to come up with this dish when I was doing an assignment focused on anti-inflammatory foods for the Culinary Nutrition program I finished this winter.

If we can reduce inflammation, we set ourselves up to feel better, look more alive, prevent disease and even get to a healthier weight. Dr. Mark Hyman has written extensively about inflammation and how to reduce it. Click here to learn more about it from him.

For this dish, I wanted to use as many anti-inflammatory foods as possible, including cauliflowerturmeric, ginger and garlic.

  • Cauliflower, a cruciferous vegetable, contains the antioxidant sulforaphane, which is known for its powerful anti-inflammatory and anti-cancer properties. Here’s my first post about cauliflower and the rest of its amazing health benefits.
  • Turmeric contains over two dozen anti-inflammatory compounds with curcumin being the most potent.
  • Ginger extract regulates pathways that halt the activation of genes involved in the inflammatory response.
  • Allium vegetables like garlic contain sulfur compounds that prevent inflammation in the body.

This recipe puts a creative spin on “steak and potatoes” by using cauliflower “steaks” and “mash.”

I was inspired to share this recipe that puts a vegan-friendly spin on a specialty dish just like the crew at the Wynn Las Vegas.  New York Times Bestselling author of The Conscious Cook and vegan chef Tal Ronnen creates vegan and vegetarian menus for every restaurant at the Wynn, and I hope to have the chance to try his food firsthand one day. Since not everyone (myself included!) can make it to Vegas for a fancy meal, making a dish like this one is the second best option!

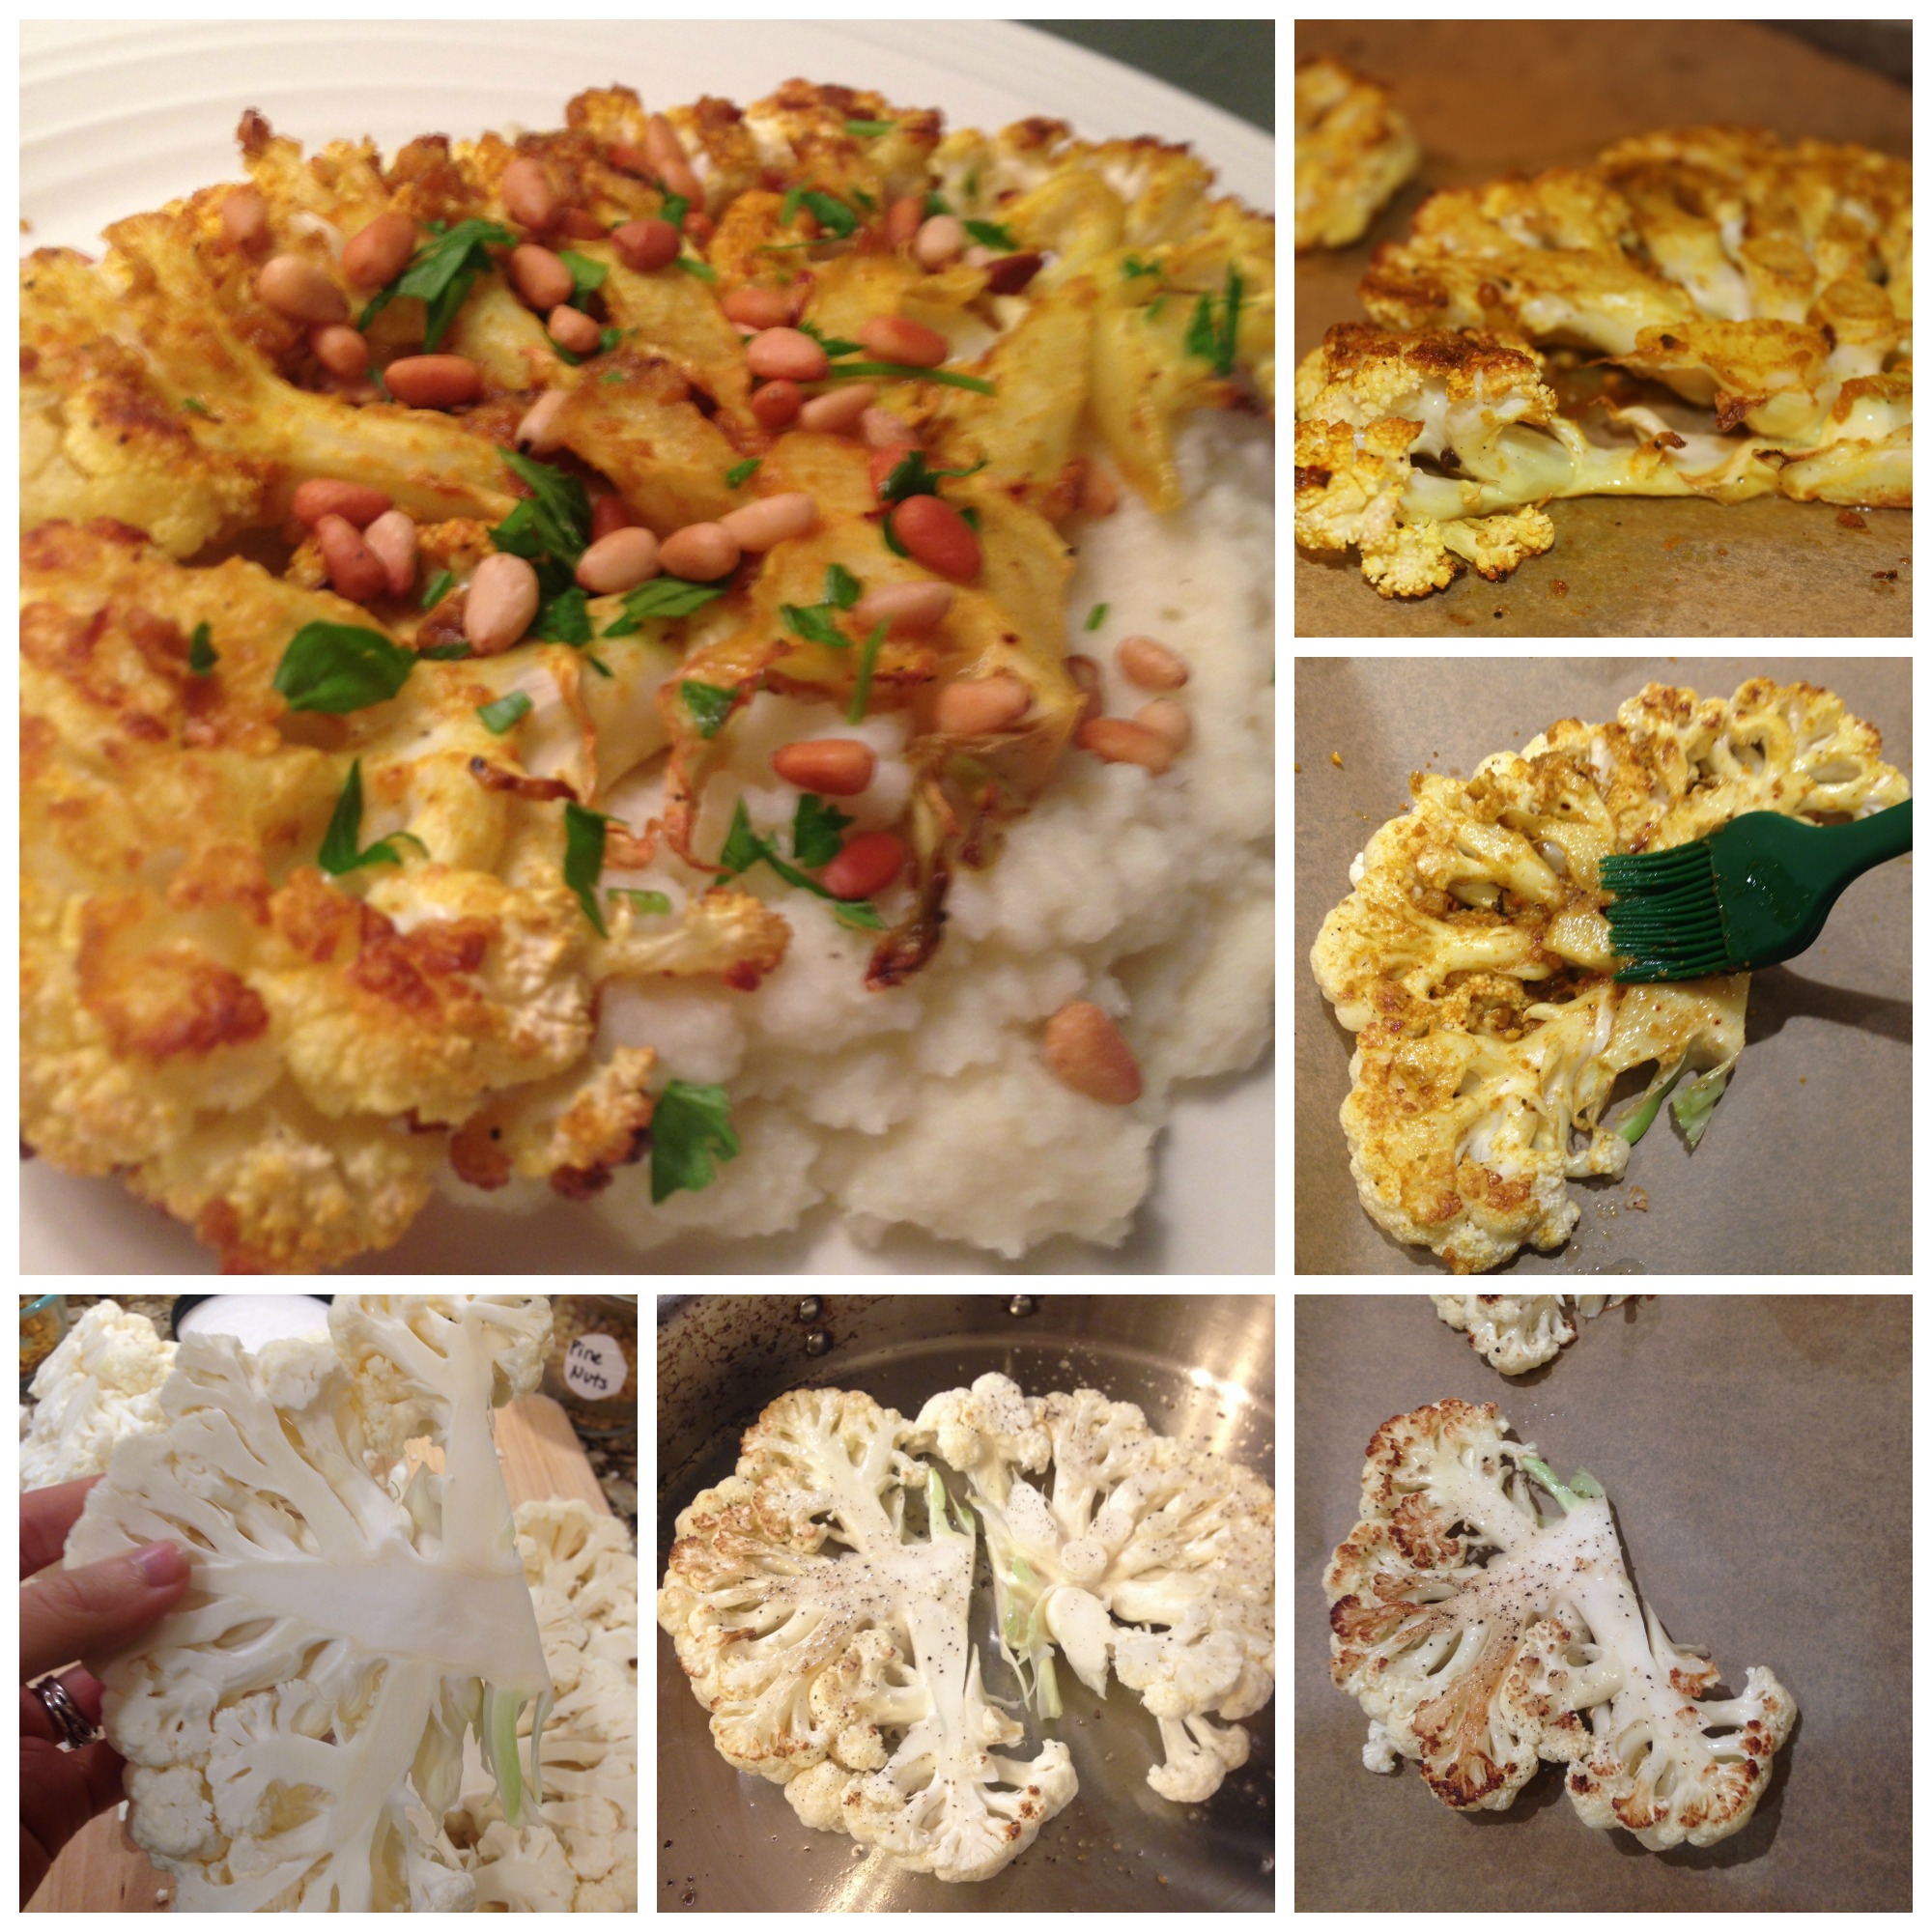
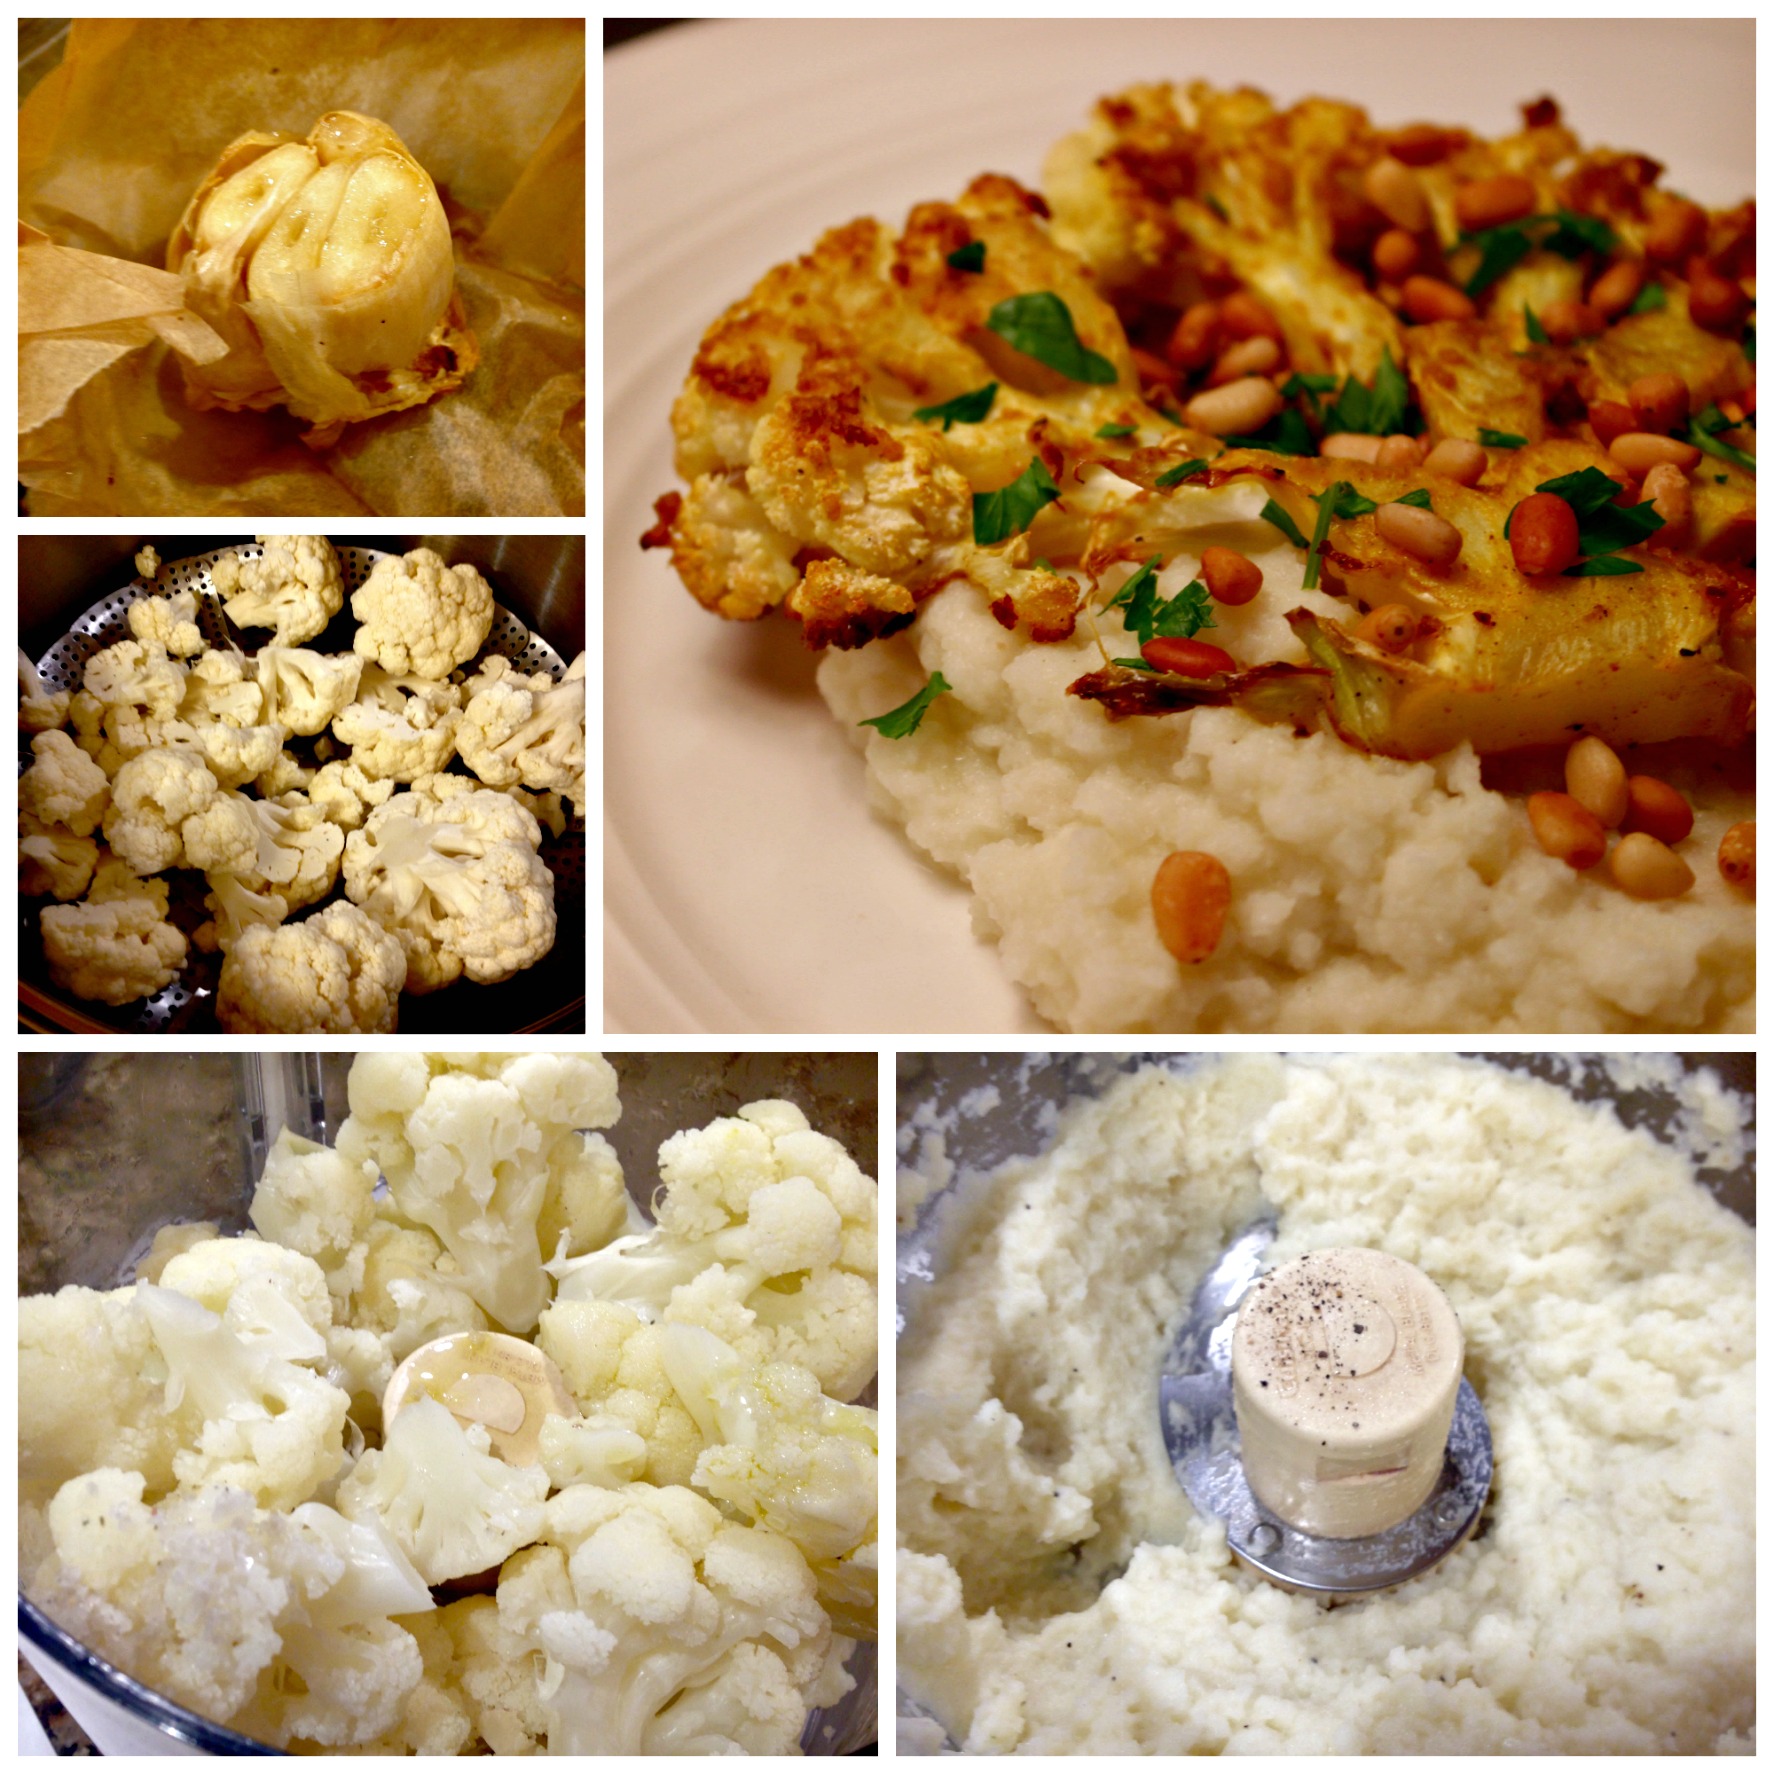
**Don’t let the ingredient list intimidate you (it’s mostly spices!). Also, I was VERY thorough on the directions and have included step-by-step pictures of the process below to help you visualize how it works. Give it a shot!*

cauli2name

Ingredients

1 small head garlic
1 teaspoon coconut oil or extra virgin olive oil
1 large head cauliflower
Sea salt and black pepper
3 tablespoons coconut oil or extra virgin olive oil
1 teaspoon ginger root
2 cloves garlic, minced
1 teaspoon ground cumin
1⁄2 teaspoon ground turmeric
1⁄2 teaspoon ground coriander
1⁄4 teaspoon red pepper flakes
2 tablespoons extra virgin olive oil
1⁄2 teaspoon sea salt
1/3 cup reserved water from steamer
Black pepper, to taste
Juice from 1 lemon
1⁄4 cup pine nuts, lightly toasted
Small handful of parsley, chopped

Step-by-Step How To Photos (Written Directions Below)

How to Make Cauliflower Steaks

How to Make Cauliflower Steaks (Directions Below!)

How to Make Cauliflower Mash

How to Make Cauliflower Mash (Directions Below!)

Directions

  1. Preheat oven to 425F.
  2. Peel and discard the papery outer layers of the head of garlic. Using a sharp knife, cut 1/4 inch from the top of cloves, exposing the individual cloves of garlic. Pour 1 teaspoon of oil on top and tightly wrap the head of garlic in foil or parchment paper. Place directly in oven, and roast for 30 minutes or until soft to the touch.
  3. While the garlic is roasting, remove the leaves and trim the stem end of the cauliflower, leaving the core intact. Using a large knife, cut the cauliflower from top to bottom into two 1-inch-thick steaks. Season each steak with salt and pepper on both sides. Set aside loose florets for the cauliflower mash.
  4. Heat 1 tablespoon of oil in a large skillet over medium-high heat. Sear the cauliflower steaks until golden brown, about 4 minutes per side. Transfer steaks to parchment-lined baking sheet.
  5. Whisk together the remaining 2 tablespoons of oil, ginger, garlic, cumin, turmeric, coriander, and red pepper flakes. Brush the mixture onto both sides of the cauliflower steaks. Roast steaks in oven, about 15 minutes.
  6. While the steaks and garlic are roasting, put the loose cauliflower florets in a steamer basket over 1-2 inches of water in a pot. Cover and steam until cauliflower softens (about 10-12 minutes). You should be able to stick a fork through it easily. Set aside 1/3 cup of the steam water.
  7. Put steamed cauliflower in a food processor and add 1⁄2 of the head of roasted garlic (squeeze each clove out by pushing on the bottom of each one after you’ve let it cool). Add olive oil, sea salt, black pepper and reserved cooking water to the food processor. Pulse until smooth. Taste, and add more garlic if you prefer.
  8. Remove cauliflower steaks and garlic from oven. Place half the cauliflower mash on each plate, top with a cauliflower steak, and then squeeze lemon juice over each steak. Sprinkle toasted pine nuts and chopped parsley over each steak, and ENJOY!
Zucchini Pasta with Cauli-fredo Sauce!

IMG_6721

The past two weeks have been a bit of a whirlwind.

I haven’t felt quite like myself because I’ve been stretching myself too thin.

All of the projects I’ve been working on have been amazing opportunities, but when I said, “yes” to them separately about 2-3 months ago, I didn’t realize they would ALL end up happening within the same week in November.

I have SO much I want to write about and a ton of new recipes to share, but a few wise friends and family members have suggested that I s-l-o-w d-o-w-n a bit and take a moment to breathe amidst this craziness.

That’s why you may notice fewer blog posts until things calm down and my schedule gets back to normal in the next 2 weeks or so.

One of the things I’m working on is a series of posts about “My Favorite Things,” where I’ll share my favorite gadgets, stocking stuffers and cookbooks, just in time for holiday shopping 🙂

I’m also working with a web designer to do some pretty cool things to this blog over the next few months, and I’m really excited to see what happens with that!

I can’t write this post without mentioning that my husband has been nothing short of a saint over the past few weeks in particular, and I’m so incredibly grateful for his support, encouragement and patience. I am very, very blessed.

IMG_6318

Although I’ve felt stretched and stressed lately, I’ve gotten to do some really fun and exciting things…many of which were milestones that I couldn’t have imagined happening a year ago!

  • I trained the staff of a local restaurant to understand the differences among some current dietary trends and types (like paleo, vegetarian, gluten-free, vegan)
  • I facilitated a documentary movie night at my church where a group of about 20 of us watched Food, Inc. and enjoyed some healthy snacks, including my favorite caramel apple dip and this kickin’ buffalo hummus
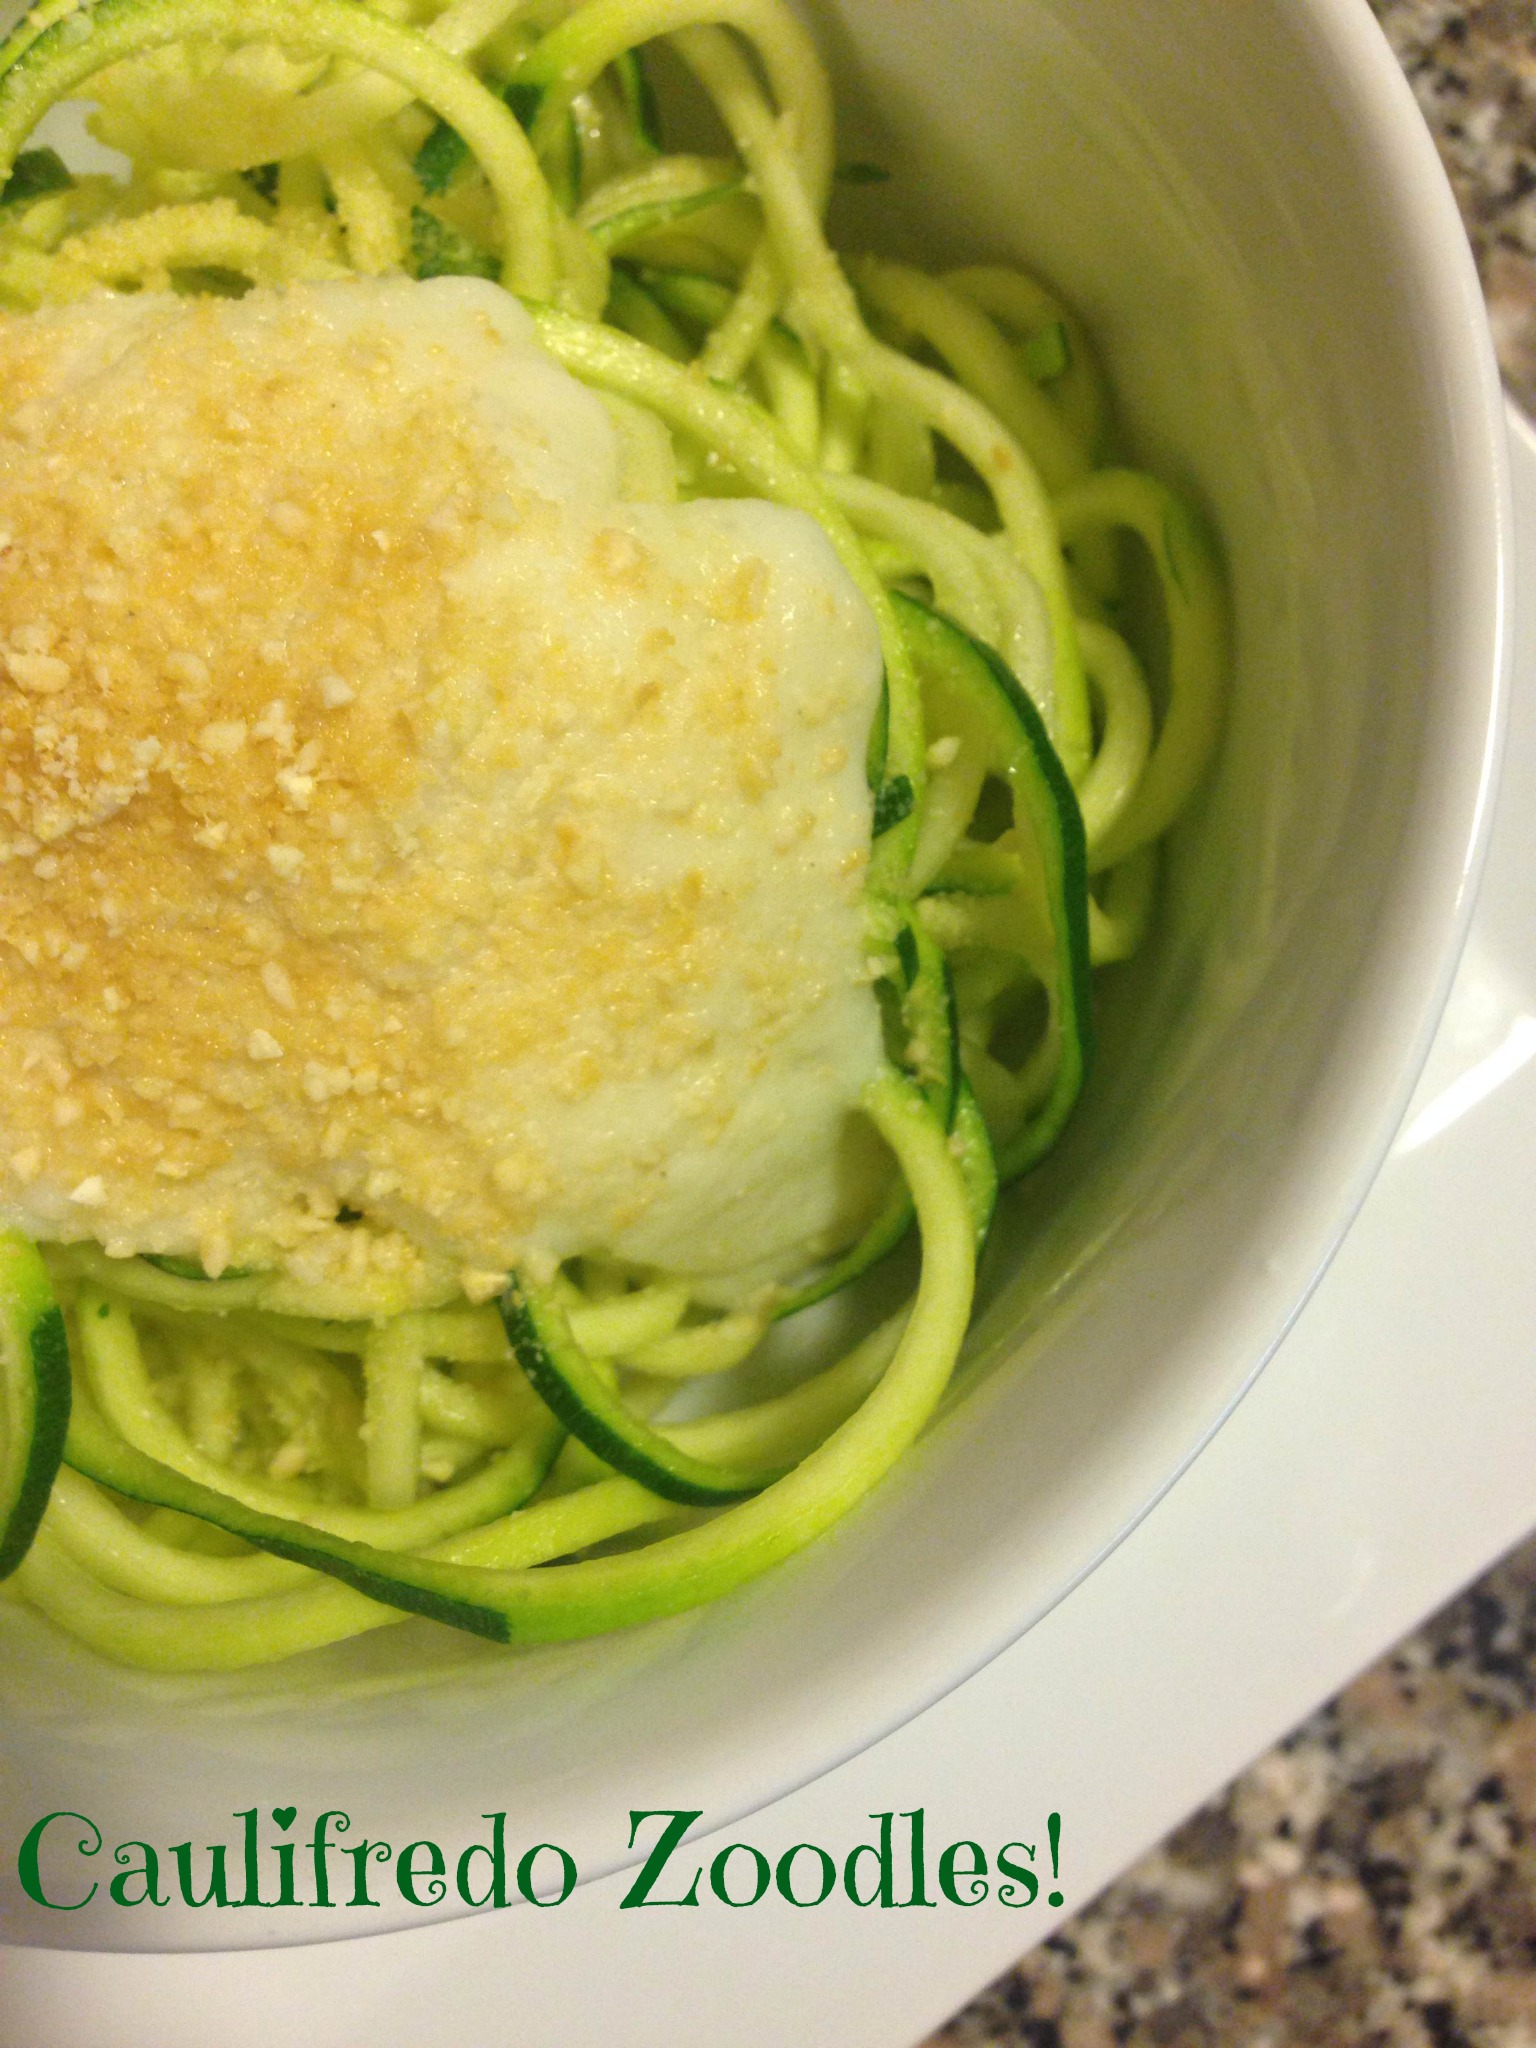
  • I taught my FIRST full cooking class in my friend’s kitchen for a party at her house. I showed the group how to make my favorite kale salad, caulifredo zucchini noodles (recipe below!) and hazelnut truffles.

IMG_7758

The process of planning out and prepping for a cooking demo is intense, and I have a new appreciation for anyone who has their own cooking show and what goes into making that happen.

Phew! It’s definitely a lot of work…but I LOVED having the opportunity to teach the group through hands on cooking.

The most rewarding part of the whole experience was hearing people say things like, “Oh my gosh, this is amazing!” and “I’m shocked by how good that tastes.” 

It’s so fun to see people get excited about eating nourishing food!

We got to play with my NEW favorite kitchen toy (a Paderno Spiralizer) during the demo as we made our own zucchini noodles in seconds. I’ve included a video below for how to use it.

https://www.youtube.com/watch?v=XbLHyAY_KRI&feature=youtu.be

Zucchini noodles are a great alternative to pasta because they don’t spike our blood sugar or contain gluten like most pasta. You’ll be AMAZED at how similar the texture is to pasta…you can still twirl it on your fork, too! The spiralizer is something you’ll want to add to your wish list.

We topped the zucchini noodles with this creamy cauliflower alfredo sauce. It’s a variation of a recipe I shared earlier this year, but I made some tweaks to improve it! I think you’ll love it.

Enjoy!

caulifredo

IMG_6721

Ingredients

  • 4 zucchini, spiralized using this awesome gadget! (You could also sub in your favorite gluten-free pasta of choice – we like the Tinkyada brown rice pasta)
  • 2 teaspoons coconut oil

Caulifredo Sauce

  • 3 cloves garlic, minced
  • 1 tablespoon coconut oil, ghee/clarified butter or grass-fed butter
  • 1 head cauliflower, chopped into florets (here’s how to break apart a head of cauliflower in seconds!)
  • 1 cup water
  • 1 teaspoon sea salt
  • ½ teaspoon onion powder
  • 1 generous pinch of pepper, to taste
  • juice from 1/2 lemon (about 1.5 tablespoons)

Directions

  1. Sauté the minced garlic in coconut oil or butter in a medium saucepan over low heat. Allow to cook for a few minutes, until the garlic is tender and fragrant but not browned.
  2. Add the 1 cup of water to the saucepan, along with the cauliflower florets, and bring the water to a boil. (The water will not cover the cauliflower, but that’s okay.) Once the water is boiling, reduce the heat to a simmer and cover the pot for 12-15 minutes or until the cauliflower is fork-tender and very soft.
  3. Transfer the entire contents of the saucepan into a blender or food processor, and season with salt and pepper. Add in lemon juice and onion powder. Process until very smooth and creamy, with a texture similar to traditional cream sauce. (Always be careful when blending hot liquids– the steam pressure can blow the lid off your blender!).
  4. Season with additional salt and pepper, if desired, and serve hot. If it seems thick, add more water. If it seems dry, add a liberal drizzle of olive oil.
  5. Place spiralized zucchini in a medium-sized frying pan greased with coconut oil, and stir for 3-4 minutes or until zucchini takes on a cooked pasta texture, sort of wilted and soft. Be careful not to overcook.
  6. Transfer zucchini noodles (AKA “zoodles”) to a plate or bowl and pour sauce on top. Sprinkle this 3-ingredient paleo parmesan cheeze on top and start eating!

Creamy Cauli-fredo Sauce! {Paleo, Vegan}

Fettuccine Alfredo.

If I had to guess, I would bet this dish is one of the most popular and beloved comfort foods of all time.

But with a cup of butter, almost as much heavy cream, and over a cup of cheese in a typical Alfredo sauce recipe, it’s not something many people can enjoy very often, especially if you’re trying to stay away from dairy or just notice that you feel better without it.

If you absolutely love fettuccine Alfredo, my goal isn’t to get you to give it up for good. Instead, I want to introduce you to a new way of preparing a similar dish…one that is a lot healthier but still creamy and comforting!

The main ingredient?

Cauliflower.

IMG_3944

Cauliflower in Alfredo sauce?? Wait a minute…how can this possibly taste good?

I have to admit, when I first saw this recipe, I was a bit skeptical…and so was Bill.

I know it sounds kind of absurd…but, trust me, it works!

One of my passions is showing how some of our favorite recipes that might not be so healthy can be flipped to a more nourishing version that is still delicious and kid/family-friendly

My ultimate test for knowing whether I’ve made a successful recipe is to have my husband, Bill, try it.

If something we make doesn’t taste good, he has no qualms saying so.

But if it’s delicious, I usually get an emphatic “oh yeah” or “this is great” (which is a lot coming from him!).

Bill and I were pleasantly surprised by the outcome of this recipe and licked our bowls clean!

Not only does this recipe taste delicious, but it doesn’t use any fancy ingredients and can be whipped up in about 20 minutes.

caulifredo

Ingredients

  • 4 zucchini, spiralized using this awesome gadget! (You could also sub in your favorite gluten-free pasta of choice – we like the Tinkyada brown rice pasta)
  • 2 teaspoons extra virgin olive oil

Caulifredo Sauce

  • 3 cloves garlic, minced
  • 1 tablespoon extra virgin olive oil or grass-fed ghee
  • 1 head cauliflower, chopped into florets (here’s how to break apart a head of cauliflower in seconds!)
  • 1 cup water
  • 1 teaspoon sea salt
  • ½ teaspoon onion powder
  • 1 generous pinch of pepper, to taste
  • juice from 1/2 lemon (about 1.5 tablespoons)

Directions

  1. Sauté the minced garlic in coconut oil or butter in a medium saucepan over low heat. Allow to cook for a few minutes, until the garlic is tender and fragrant but not browned.
  2. Add the 1 cup of water to the saucepan, along with the cauliflower florets, and bring the water to a boil. (The water will not cover the cauliflower, but that’s okay.) Once the water is boiling, reduce the heat to a simmer and cover the pot for 12-15 minutes or until the cauliflower is fork-tender and very soft.
  3. Transfer the entire contents of the saucepan into a blender or food processor, and season with salt and pepper. Add in lemon juice and onion powder. Process until very smooth and creamy, with a texture similar to traditional cream sauce. (Always be careful when blending hot liquids– the steam pressure can blow the lid off your blender!).
  4. Season with additional salt and pepper, if desired, and serve hot. If it seems thick, add more water. If it seems dry, add a liberal drizzle of olive oil.
  5. Place spiralized zucchini in a medium-sized frying pan greased with coconut oil, and stir for 3-4 minutes or until zucchini takes on a cooked pasta texture, sort of wilted and soft. Be careful not to overcook.
  6. Transfer zucchini noodles (AKA “zoodles”) to a plate or bowl and pour sauce on top. Sprinkle this 3-ingredient paleo parmesan cheeze on top and start eating!

Powered by WordPress & Theme by Anders Norén