Notice: Function _load_textdomain_just_in_time was called incorrectly. Translation loading for the social_sharing domain was triggered too early. This is usually an indicator for some code in the plugin or theme running too early. Translations should be loaded at the init action or later. Please see Debugging in WordPress for more information. (This message was added in version 6.7.0.) in /var/www/wp-includes/functions.php on line 6121
Vegan Archives · Page 13 of 15 · Rachel's Nourishing Kitchen

Category: Vegan Page 13 of 15

"Berry" Quick Cinnamon Overnight Oats

Most mornings, Bill and I have a smoothie for breakfast. We pull recipes from this list and from my “Blend It Up” Pinterest board.

Sometimes I’m in the mood for something besides a smoothie. Variety is one of the keys to a healthy, balanced diet that gives your body all the nutrients it needs. Plus, variety keeps meals fun and exciting 🙂

Today, I’m putting a new spin on a classic favorite – oatmeal!

The best part?

You don’t even have to cook it. It’s one of those set-it-and-forget-it recipes that takes the hassle out of breakfast!

IMG_6051

I used to eat oatmeal every day for breakfast because it’s a pretty quick, easy, and healthy meal. Oats have tons of health benefits, too!

The way I usually make oatmeal is by cooking it slowly in a pot on the stove…but that’s not always the most convenient thing to do, especially in the morning, so I tried something new.

Overnight oats!

My friend Jess and I made a variation of an overnight oats recipe a few months ago when we did a cooking demo for a group of her employees. After browsing through several other recipes online, I came up with one that I REALLY like!

I’ve already made it twice this week, and it has come in handy on mornings when I’ve been pressed for time.

IMG_6062

This overnight oats recipe takes less than 5 minutes to put together and is healthy, tasty, convenient grab-and-go option, perfect for when you’re feeling rushed in the morning.

All of the ingredients magically come together while they’re chillin’ in the fridge and you’re catching up on some sleep.

One thing I love about this recipe is that you can prep several jars at once and have breakfast ready to go for a few days in a row. That way, you literally don’t even have to think about what you’re going to do for breakfast in the morning.

All you have to do is open your fridge, grab a jar, and hit the road!

The possibilities for combinations of spices and add-ins are endless, so experiment with it to find what you like best! Feel free to share below if you find a combo that you really like!

“Berry” Quick Cinnamon Overnight Oats

IMG_6050

Berry Quick Overnight Oats

Oats

  • 1/4 cup unsweetened applesauce (or half of a ripe banana)
  • 2 teaspoons chia seeds
  • 1 teaspoon cinnamon
  • pinch ground ginger
  • pinch ground nutmeg
  • pinch fine grain sea salt
  • 1/2 teaspoon vanilla extract
  • 1/3 cup rolled oats (I use gluten-free oats)
  • 1/2 cup almond milk (unsweetened)

Toppings

  • 1 tablespoon chopped nuts or seeds
  • 1/4 cup berries
  1. Mash the banana in the bottom of a mason jar or mug with a spoon until it’s the consistency of applesauce. OR pour applesauce into bottom of jar.

  2. Add spices, chia seeds, salt, vanilla, oats and raisins to banana mash and stir to mix everything together.

  3. Add almond milk and stir until all ingredients are combined. It will seem watery. That’s normal! The chia seeds and oats will absorb the liquid, and it will thicken up overnight, so just give it time.

  4. Store jar or mug in the fridge overnight, and everything will gel together.

  5. Remove from fridge in the morning and top with or stir in your choice of nuts, seeds, nut butter and/or berries (I used slivered almonds and blackberries!).

Optional/additional add-ins: 2 teaspoons almond butter or peanut butter, shredded unsweetened coconut, or sliced bananas, peaches or any other fruit you like!


Mash the banana in the bottom of a mason jar or mug with a spoon until it's the consistency of applesauce.

Mash the banana in the bottom of a mason jar or mug with a spoon until it’s the consistency of applesauce. OR pour applesauce into bottom of jar.

Add spices, chia seeds, salt, vanilla, oats and raisin to banana mash and stir to combine.

Add spices, chia seeds, salt, vanilla, oats and raisins to banana mash and stir to mix everything together.

Add almond milk and stir until everything is combined.

Add almond milk and stir until all ingredients are combined. It will seem watery. That’s normal! The chia seeds and oats will absorb the liquid, and it will thicken up overnight, so just give it time.

Store jar or mug in the fridge overnight. By morning, the oats and chia seeds will have absorbed the liquid and be ready to eat! No cooking necessary :)

Store jar or mug in the fridge overnight, and everything will gel together.

Top with or stir in your choice of nuts, seeds, nut butter and/or berries (I used slivered almonds and blackberries!).

Remove from fridge in the morning and top with or stir in your choice of nuts, seeds, nut butter and/or berries (I used slivered almonds and blackberries!).

You can heat it up if you’d like or just enjoy it cold, which works well when the weather is warmer like it is now. Add more almond milk if you want to thin it out. Enjoy 🙂
Heirloom Tomato & Chickpea Summer Salad

I used to hate tomatoes. 

I don’t know what it was specifically that fueled my aversion, but unless they were blended together in pizza sauce or in my can of Spaghettios or Beefaroni, I wanted nothing to do with them.

IMG_5520

Fortunately, over the years as I’ve opened myself up to foods and giving them a second chance rather than immediately writing them off, I’ve found that I really like tomatoes.

Especially heirloom tomatoes.

If you want to learn all about heirloom tomatoes, check out this link by a guy who has an entire website devoted to tomatoes!

I also pulled this little bit of info off of Hometown Harvest’s website. I’ve met the owners, Tony and Abby, and respect and admire their approach to food and the fresh, local products they source to their customers, which is why Bill and I switched from a different produce delivery company to Hometown Harvest.

An heirloom tomato is an open-pollinated tomato whose seed grows “true to type”—meaning, if you plant Cherokee Purple seed, you’re going to get Cherokee Purple plants. From generation to generation, that seed will stay true. Some heirloom tomatoes have, in fact, stayed within one family and so are heirlooms in the truest sense of the word. Other heirloom tomatoes circulate widely.

Beautiful heirloom tomatoes

Beautiful heirloom tomatoes

Heirloom tomatoes also tend to have a thinner skin and are more prone to bruising and puncturing, so it’s important to handle them carefully. Their flavor is second to none, and they come in lots of different colors, so they spruce up the plate!

I made this recipe using heirloom tomatoes for the first time last summer and LOVED it.

Oh my goodness it is so tasty!  It was the perfect way to use the heirloom tomatoes we got in our Hometown Harvest bag this week and at the farmer’s market in Easton, Maryland on Saturday morning.

If you like to “go downy ocean, hun,” you should plan to stop by Easton’s farmer’s market on your way to or from the beach.

We’ll be making this dish tomorrow night for Meatless Monday. Give it a whirl if you’re looking for something new to try. Enjoy! 🙂

Heirloom Tomatoes & Chickpea Summer Salad

IMG_2704 - Version 2

Ingredients

Serves 6

Base

  • 2 large heirloom tomatoes, sliced into 1/2 inch discs (or whatever thickness you like!)
  • 1-2 handfuls of fresh greens or lettuce of your choice

Chickpea Medley

  • 5.5-6 cups cooked (~ 3 15-ounce cans) garbanzo beans (chickpeas), drained and rinsed (We like Eden brand!)
  • 5 ounce baby spinach
  • 1.5 cups cilantro, large stems removed (or parsley if you don’t like cilantro or want a milder taste)
  • 3/4 cup red onion, chopped finely

Dressing

  • 1/4 cup fresh lime juice
  • 2 tablespoons extra virgin olive oil
  • 2 garlic cloves, minced
  • 1 teaspoon ground cumin
  • 1 teaspoon 100% pure maple syrup (or other liquid sweetener)
  • 3/4 teaspoon sea salt + ground pepper

Arrange the tomato slices on top of the greens and then follow this link to the full recipe for the medley and dressing from one of my favorite vegan bloggers over at oh she glows (she makes veggies taste fantastic!).

Easy 5-Minute Chocolate Avocado Mousse

Indulgent

Creamy

Rich

Silky

Chocolatey

Smooth

Decadent

Those words pretty much sum up this dessert and it’s awesomeness. Seriously though, this stuff is AMAZING…and family and friend approved! I’ve served it at multiple cooking demonstrations, dinner parties, and events, and it is a hit every time.

Before trying something I’ve made, people who know me will often say, “Don’t tell me what’s in it.”

After seeing recipes for caulifredo sauce, zucchini pasta, no-cheese nacho cheese, and green smoothies, I guess I can see why they’d be hesitant 🙂

More often than not, though, they take the risk…try it…and LOVE it!

The next question follows just about every time:

“Okay…what’s IN this??”

The secret ingredient in today’s recipe for chocolate mousse?

Avocado.

Our friends couldn’t believe avocado was in this dish. They commented how rich and delicious it was, too. When I told them there was no dairy or refined white sugar in it either, the head scratching continued.

This mousse is super easy to make (takes 5-10 minutes), and a little goes a long way. You can print the recipe below, but here is a fun video that shows you how it’s done!

https://youtu.be/BTP84aP2At4

Use it as a dip for sliced fruit or berries, serve it as a pudding with berries or cacao nibs sprinkled on top, or add some almond milk to it (maybe a cup?) and then pour it into Popsicle molds for a frozen chocolate treat!

Or, if you’re like me, just take a few spoonfuls straight out of the blender and indulge right away 🙂 Your secret’s safe with me!

Chocolate Lover’s Chocolate Avocado Mousse (Dairy-Free)

IMG_5799

Chocolate Avocado Mousse

You’ll never know there are avocados hidden in this decadent mousse. Top it off with some fresh berries and raw cacao nibs for additional texture, flavor and color!

  • 6 large Medjool dates (if they're not soft, soak them in water for 10-15 minutes first, then pour off the water)
  • 1 large avocado
  • 2 tablespoons almond butter
  • 1/3 cup raw cacao powder
  • 1/3 cup 100% pure maple syrup
  • 1/3 cup water
  • 1 teaspoon vanilla extract
  • 1/8 teaspoon fine grain sea salt
  1. Put all ingredients in the order listed in a food processor and process until it reaches a smooth, mousse-like consistency.  I run mine for about 3-5 minutes, scraping down the sides as needed.

Top with berries, chopped nuts or seeds, shredded coconut or cacao nibs for a bigger health boost!

A New Veggie Recipe to Try (Plus Natural Heartburn Relief!)

Bill and I love going out to new restaurants to eat, but doing that more than a couple times a month can really add up!

Sometimes, we choose to create our own meals at home for a fraction of what we would have paid at a restaurant.

Plus, we don’t have to worry about tacking on a tip to the meal or running late (which never happens… 🙂 )

Out to dinner at Woodberry Kitchen, one of our favorite restaurants, for our one-year anniversary

Out to dinner at Woodberry Kitchen, one of our favorite restaurants, for our one-year anniversary

When we were figuring out what to make for dinner the other night, we decided to try a new vegetable. It keeps the meal exciting and makes it more like a true restaurant experience.

Not only that, but the vegetable we used has some serious medicinal/healing properties that help our digestive system work better (bonus!).

As I’ve been working on healing my digestion over the past few years (it’s a process!), I’ve learned a thing or two about what foods make it work best. After years of going from doctor to doctor, surgery to surgery and pill to pill to “fix” me, I finally feel like I have some answers…and let me tell you, it has been a really empowering experience and confidence-booster!

Apparently, the combination of all of the antibiotics I took as a kid and the 10 years of daily acid reducers as an adult, along with the lifetime impact of eating lots of processed, packaged foods and what turned out to be problem foods for me (dairy and wheat) did a number on my digestive system.

I didn’t know it at the time, but they were also some of the reasons I used to get sick so often, struggled with 15-20 pounds that just wouldn’t budge, and why I had lots of bloating, gas, and other digestive frustrations. Sounds like a party, right?

I had no idea that 70-80% of my immune system was located in and around my digestive tract, mainly my intestines. By healing my digestion, I would start to heal (and energize!) my entire body. Who knew??

The main reason I’m such a fan of this lesser known veggie is because of how healing it is for the stomach and rest of the digestive system.

It’s also a potent cancer fighter.

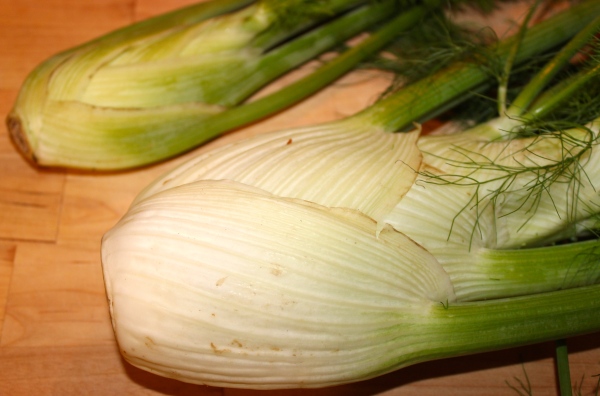
Fennel bulbs

Funky-looking fennel bulbs!

Meet fennel.

Fennel is a plant that most of us have heard of but few of us have actually bought/prepared/eaten. It has a very mild licorice flavor and is subtly sweet.

You’ve probably walked by it at the grocery store, given it an odd look, and thought, “What the heck is that, and what do I do with it??” I’m here today to tell you!

Fennel and licorice are both known as digestive soothers, and many people (especially those with reflux/heartburn/indigestion) find that drinking fennel tea, and taking either digestive enzymes containing fennel or DGL (deglycyrrhizinated licorice) tablets before a meal promotes improved digestion. My mom now swears by DGL tablets, and I’ve had lots of success taking them myself.

DGL tablets create a soothing coating that lines your digestive system prior to eating, which calms and soothes your digestive tract and reduces the likelihood you’ll have to deal with indigestion, gas and bloating. Pretty cool, right?

Click this link or this one to order DGL tablets and learn more about them. Talk to your doctor or to a functional medicine doctor about whether these could be a good option for you.

Now, back to the veg!

Fennel tastes delicious when roasted, so that’s how we prepared it today.

We served the roasted fennel with some local, grass-fed beef tenderloin along with broccoli that was lightly steamed and then sautéed with roasted red pepper flakes, garlic, and some sea salt and pepper. It was a very tasty meal!

There you have it. Now you no longer have an excuse to ignore fennel at the grocery store or farmer’s market...and have lots of reasons to try this super healthy, medicinal veggie!

Easy Oven-Roasted Fennel

Roasted fennel with beautiful caramelization!

Roasted fennel with beautiful caramelization!

Ingredients

  • 1 pound fennel, quartered lengthwise (I used 2 bulbs)
  • 1-2 tablespoons of extra virgin olive oil or coconut oil
  • 1/2 teaspoon of sea salt, more to taste
  • freshly ground black pepper, to taste
  • juice from 1/2 lemon
  • Optional: sprinkle some freshly chopped rosemary on top before roasting

Directions

  1. Preheat oven to 475F.
  2. Follow the step-by-step pictures below to prep and quarter the fennel.  Cut off the green stalks and a 1/2″ disc from the bottom of the bulb, and remove any discolored outer leaves from the bulb, so you’re just left with the white/light-green fennel bulb to quarter and roast.
  3. In a medium bowl, toss the fennel quarters with your choice of oil, sea salt and black pepper.
  4. Put the fennel on a parchment or foil-lined baking sheet, cut-side down, so they’re evenly spaced out. Roast for 15 minutes, or until the edges begin to brown. Flip the fennel to the other side and continue roasting until they are browned, about 10  more minutes.
  5. Place the fennel back in the bowl you tossed them with and squeeze the juice of half a lemon on top of the fennel. Toss to coat evenly.
Chop off the bottom tough disc - about 1/2"

Chop off the bottom tough disc – about 1/2″

Chop off the tougher green parts. You can save them and throw them into soups as you would celery. You can save the fuzzy parts (AKA fronds) and use them as decoration like you would dill.

Chop off the green stalks. You can save them and throw them into soups as you would celery. You can save the fuzzy parts (AKA fronds) and use them as decoration like you would dill.

Chop the white bulb into quarters

Chop the white bulb into quarters

This is what the bulb looks like inside once you've quartered it

This is what the bulb looks like inside once you’ve quartered it

Give it a nice drizzle of coconut or olive oil along with some sea salt and black pepper before putting it in the oven to roast!

Give it a nice drizzle of coconut or olive oil along with some sea salt and black pepper before putting it in the oven to roast!

Deliciously Dairy-Free Mini Cheesecakes…3 Ways!

Incredibly Creamy. Magically Melt-In-Your-Mouth. Deliciously Dairy-Free.

Cheesecakes…without cheese?

Chocolate peanut butter cup cheesecake

Chocolate peanut butter cup cheesecake

Since I look and feel my best without milk products, cream, and cheese but still like foods to have a creamy texture (especially desserts, dips and sauces!), I find healthy, alternative ways to prepare them. All of the recipes on this blog are dairy-free (i.e., no milk from mammals!).

This is one of those recipes that I tried on a whim, never having made dairy-free cheesecakes before.

I know it sounds crazy to think that raw cashews could possibly turn into a base creamy enough to imitate cheesecake, but somehow it just works.

Peanut butter cheesecake

Peanut butter cheesecake

These little treats turned out SO great. I was pleasantly surprised. I would have eaten the whole pan of them on my own. 🙂
About 10 friends and coworkers and my hubby tried these and raved about them…they were shocked that the base was made of cashews!

Deliciously Dairy-Free Mini Cheesecakes…3 Ways! (Vegan, Gluten-Free)

IMG_4429

Chocolate peanut butter cup and blueberry lemon swirl cheesecakes

Ingredients

Crust

  • 1 cup pitted Medjool dates (soaked in warm water for 10 minutes then drained)
  • 1/2 cup raw walnuts
  • 1/2 cup raw almonds
  • Pinch sea salt

Part 1: Basic Filling

  • 1.5 cups raw, unsalted cashews (soaked in water 4-6 hours then pour off the water and rinse the cashews)
  • 3 tablespoons of fresh lemon juice
  • 1/3 cup coconut oil, melted
  • 1/2 cup + 2 tablespoons full fat coconut milk (for the creamiest texture, scoop the cream off of the top when you open the can)
  • 1/2 cup pure maple syrup

Part 2: Filling Options (You can just use the basic recipe and prepare them as is, but I made these 3 variations, and they turned out well. My favorite was the peanut butter one!)

IMG_4418

Peanut Butter: Add 3-4 tablespoons natural peanut butter (peanuts and maybe salt as the only ingredients) to the basic filling. Taste it, and add more peanut butter until you reach your desired peanut buttery taste.

Chocolate Peanut Butter Cup: Follow steps for peanut butter cheesecakes above. Sprinkle a few chocolate chips on top (I use Enjoy Life brand) or shave some dark chocolate on top. Green & Black and Theo are two of my favorite brands of dark chocolate! Look for >70% cacao content.

Blueberry Lemon Swirl: Bring 1 cup of blueberries to a boil in a small pot, stirring constantly, smashing the blueberries with a spoon as you stir. Turn heat to medium low. Mix 1 tablespoon of water with 2 teaspoons of arrowroot powder or cornstarch and mix it in with the blueberries. Continue stirring and mashing until the mixture becomes gel-like. Set the blueberry sauce aside to cool for 10 minutes.

Directions

1) Add dates to a food processor and blend until it forms into a ball. Remove from container and set aside.

IMG_5557

2) Add nuts to the food processor and process until finely ground. Add date ball back in and blend until a loose dough forms – it should stick together when you squeeze a bit between your fingers. Add a pinch of sea salt to taste.

IMG_5558

3) Scoop 1 heaping tablespoon of the crust into the bottom of a silicone muffin pan and press with fingers, small glass or the bottom of a spice bottle (this worked best for me). Set in freezer to firm up.

IMG_5560

4) Add all filling ingredients to a blender and mix until very smooth. If you don’t have a Vitamix (you don’t need one!), blend them for a minute and then liquify or puree until silky smooth.

Taste and adjust seasonings as needed. If adding peanut butter, add to the blender and mix until thoroughly combined. Leave it as a peanut butter cheesecake OR sprinkle a few chocolate chips or shavings on top.

If flavoring with blueberry sauce, wait and swirl 1 teaspoon of it on top of plain cheesecakes before freezing.

IMG_5577

5) Divide filling evenly among the muffin tins. Cover with plastic wrap and freeze until hard – about 4-6 hours.

IMG_5587

6) Pop the cheesecakes out of the muffin pan and set them out at room temperature 15-20 minutes to thaw them out. They taste best (and creamiest!) when thawed out, but they will melt if you leave them out beyond about 40 minutes, so watch them carefully!

The cheesecakes will keep in the freezer for 1-2 weeks.

The cheesecake trio thawing out, so we can devour them!

The cheesecake trio thawing out, so we can devour them!

This recipe is adapted from the easy vegan cheesecake recipe from Minimalist Baker. 

Caribbean Island Breeze Smoothie {Vegan, Paleo, Dairy-Free}

This smoothie takes me back to August 2011 when my hubby and I were relaxing poolside on our honeymoon in Jamaica.

We tried all different kinds of mixed drinks while we were there and loved the island flavors. We also enjoyed fresh fruit every day, including papaya, pineapple and mango. The island was beautiful and definitely felt like paradise! If you would like to visit, why not do so in style? Check out villas in Jamaica from Exceptional Villas.

On the beach in Jamaica, mon!

On the beach in Jamaica, mon!

Fast forward almost three years, and Bill and I have found a way to bring some of those island flavors to our kitchen through our cooking AND smoothie making!

We enjoy a smoothie just about every day for breakfast because it fills us up for hours and is a quick and easy way to get a concentrated source of anti-aging, disease fighting, energy-boosting nutrients into our diet. For all of those reasons, it’s also one of the ways I effortlessly regulate my weight. Click here to learn more about the health benefits of green smoothies.

In today’s smoothie, I used a variety of super healthy ingredients that come together to bring you a taste of paradise 🙂

Coconut Water

Think of coconut water as the new Gatorade…but healthier! Gatorade is loaded with chemicals, refined sugar and artificial colors and flavors that don’t nourish our bodies. Coconut water is a great natural source of electrolytes – minerals in our blood and body fluids that carry an electric charge, which affects the amount of water in our body, muscle function, and a variety of other processes.

Harmless Harvest makes my favorite coconut water (which I just found out Safeway sells! Whole Foods, MOMs and Wegmans sell it, too). This site has a great post about the top 10 ways your body benefits from coconut water. To learn more about the best coconut water brands click here.

Leafy Greens

A curly bunch of kale!

A curly bunch of kale!

Leafy greens are one of the most nutrient-dense, disease-fighting, health-promoting foods in the world, foods we should eat a lot of on a daily basis. They are detoxifying (clean us out!), antiinflammatory (cool the body), cancerfighting, oxygenating, alkaline (reduce acidity in our body), and loaded with anti-aging antioxidants and nutrients.

It’s important to rotate your greens, too. Variety is the spice of life 🙂 Check out this link for tips on how to do that. I like to rotate between kale (baby and regular), spinach, collard greens, Swiss chard and Romaine lettuce.

Pineapple

The magic of pineapple is an enzyme called “bromelain” (say it, “BRO-ma-lane”). This enzyme breaks down proteins and foods and is a natural detoxifier (AKA body gunk cleaner outer). It also helps improve circulation and reduce mucus, which builds up in our digestive system, sinuses, and respiratory system. Clearing out mucus is important for overall health and beauty. Pineapple also contains manganese, which promotes skin healing and overall skin health.

Chia Seeds

Ch-ch-ch-chia seeds! You can find these at any health food store, Wegmans, Trader Joes or online at Amazon, Vitacost or other stores.

Ch-ch-ch-chia seeds! You can find these at any health food store, Wegmans, Trader Joes or online at Amazon, Vitacost or other stores.

These teeny tiny seeds are a beauty detox and anti-inflammatory super food. They swell to 10-15 times their original size when combined with liquid and form a gel, which helps to keep us feeling full and hydrated for hours.

Since they contain lots of fiber, they help balance our blood sugar and keep energy levels up. Their gel-like consistency promotes optimal digestion and keeps things moving in our digestive system (trust me, we want to keep things moving!).

Lastly, they contain high levels of antioxidants, which help counteract the damage of things like stress, poor diet, smoking and other health stressors, and omega-3 fatty acids, which are important for balancing hormones and nerve functions.

Bananas, shredded coconut, and mango are a few other ingredients in this smoothie that are loaded with health benefits, too, but let’s just get on with the recipe! To learn more about the health benefits of any one of those foods, check out this link for the World’s Healthiest Foods.

Caribbean Island Breeze Smoothie

IMG_4710

Caribbean Island Breeze Smoothie

Inspired by the tropical flavors from our honeymoon, this smoothie is packed with nourishment and will keep you full for hours!

  • 2 cups filtered water (or coconut water)
  • 2 cups baby spinach (loosely packed)
  • 1 cup frozen pineapple
  • 1 cup frozen mango
  • 1 banana (peeled and frozen)
  • 2 tablespoons chia seeds (or hemp seeds)
  • 1/2 teaspoon fresh ginger root
  • 1/2 avocado flesh
  • 1 teaspoon fresh lime juice
  1. Put all ingredients in a blender, in the order listed above, and blend for 30-60 seconds until the smoothie is fully blended.

**If you don’t have a high powered blender, try blending just the liquid and greens FIRST and then add in the other ingredients once the greens have blended.**

tropical-breeze smoothie

Mexican-Inspired Black Bean Quinoa Salad {Gluten-Free}

It’s summer, and you know what that means?

Cookouts!

When the weather is warmer, we often crave lighter, more cooling foods. For that reason, I like to prepare healthier alternatives to the heavier potato, egg and pasta side salads we typically see at picnics, potlucks and cookouts.

If you want a quick and delicious dish to bring to your next cookout or potluck, give this one a try! It’s packed with plant-based protein, healthy fats, filling fiber, and TONS of flavor.

It also gave me a reason to use these beautiful spring onions 🙂

Aren't these pretty?

This recipe was inspired by one from Angela, who writes an amazing blog over at ohsheglows. She just came out with her first cookbook, too! It’s on my wish list.

I made a few tweaks to the salad itself and the dressing based on the flavors we like.

The original recipe called for 3 times as much cilantro, but I find cilantro to have a very strong taste, so I reduced it. I also tossed in some creamy avocado and added a little more flavor to the dressing by throwing in some chili powder and a subtle pinch of cayenne pepper.

As always, Bill added a few shakes of hot sauce on top of his bowl and liked it so much that he went back for seconds! Success 🙂

Cumin-Lime Black Bean Quinoa Salad

This salad was delicious. Bill went back for seconds AND had leftovers for lunch the next day! Servings: 6

Salad Ingredients

  • 1 tablespoon ghee
  • 1 yellow onion, diced
  • 3 cloves garlic, minced
  • 1 cup uncooked quinoa (or 3 cups cooked). Click here for how to cook perfect quinoa every time. You could also sub in brown rice instead.
  • 1 thumb-sized piece kombu (find it in the Asian aisle of the grocery store)
  • 1 (15-ounce) can black beans (or 1.5 cups cooked), drained and rinsed. We like the brand “Eden.”
  • 1/2 cup cilantro, finely chopped
  • 4 medium carrots, grated/shredded (about 1.5 cups)
  • 4 green onions/scallions, chopped
  • 1 avocado, diced

Dressing Ingredients

  • 1/4 cup fresh lime juice
  • 1 large clove garlic, minced
  • 1 teaspoon ground cumin
  • 1/2 teaspoon chili powder
  • 1/2 teaspoon fine grain sea salt
  • 1/3 cup extra virgin olive oil
  • Pinch of cayenne pepper
  • Black pepper to taste

Directions

  1. Rinse quinoa under cold water in a fine mesh strainer until the water runs clear. Set quinoa aside.
  2. Add ghee to medium pot over medium-high heat. Add onions and saute 3-4 minutes or until they start to soften. Then, add garlic and saute 1 more minute.
  3. Add quinoa to pot along with kombu and 2 cups water and bring to a boil over medium high heat. Once boiling, reduce to a simmer and cover about 12-15 minutes or until you see little white tails pop off the quinoa and no water remains. DO NOT STIR the quinoa during this time.
  4. After cooking the quinoa, dispose of the kombu piece, and let the quinoa cool for 10-15 minutes. Fluff with a fork if needed.
  5. In a large bowl, combine the quinoa, drained and rinsed black beans, cilantro, carrots, green onions and avocado.
  6. Whisk together the dressing ingredients, pour the dressing onto the salad, and toss to combine. Season with additional salt and pepper to taste.

Make the salad the day before your next cookout, potluck or party, and the flavors will come together even more once you serve it. If you make it ahead of time, throw the avocado on just before serving, so it’s as bright green as possible.

Chunky Monkey Peanut Butter Chocolate Milkshake (Dairy-Free)

If you…

Are a chocohalic craving healthier sweet treats.

Love the taste of peanut butter and chocolate, especially in cool, creamy desserts.

Don’t want to deal with the bloating and tummy ache that usually follows a thick, dairy-based milkshake…

Then you have to try this chunky monkey peanut butter chocolate milkshake!

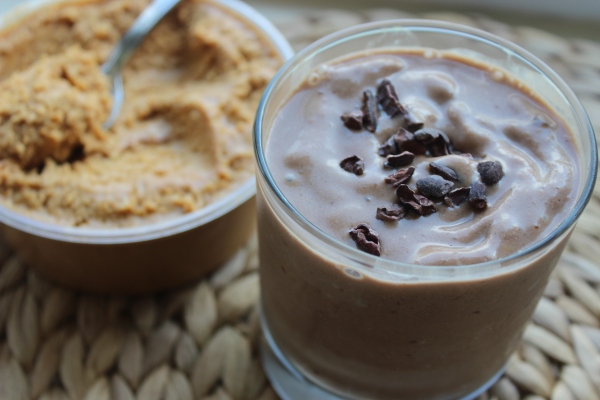
IMG_5106

Peanut butter + chocolate is one of my absolute favorite food combinations, and they come together wonderfully in this recipe.

I was inspired by a recipe I found on The Detoxinista’s website for a Chocolate Peanut Butter Shake and put my own spin on it to come up with what is now one of my favorite smoothie shakes.

I subbed in raw cacao powder for the cocoa powder. Raw cacao powder is loaded with disease-fighting, anti-aging antioxidants along with tons of other vitamins and minerals.

Because it’s not heat-treated like traditional cocoa powder, cacao powder has more nutrients intact. It’s our go-to add-in to give smoothies, shakes and desserts a chocolatety tasteThis is where we buy cacao powder, but you can find it at any health food store, Wegmans, and even at Home Goods.

This smoothie shake tastes so creamy, rich and decadent that you won’t believe it’s healthy. Like all of my recipes, it’s dairy-free, so it’s easier on your stomach and digestion than milk/yogurt/ice cream-based shakes.

Goodbye, tummyache…hello, tasty shake! 🙂

Chunky Monkey Peanut Butter Chocolate Milkshake (Dairy-Free)

Peanut butter chocolatey goodness!

Peanut butter chocolatey goodness!

Servings: 2 (cut recipe in half for a single serving)

Ingredients* (see notes below)

  • 1 1/2 cups almond milk, homemade or store-bought
  • 2 frozen bananas (Make sure you peel them before freezing them. We keep a stash in our freezer)
  • 2 tablespoons raw cacao powder
  • 1 teaspoon pure vanilla extract
  • 2 tablespoons ground flaxseed/flax meal
  • 3-4 tablespoons natural peanut butter
  • 3 large Medjool dates, pitted
  • 1-2 handfuls baby spinach (you won’t taste it, I promise!)
  • Optional: 1 tablespoon raw cacao nibs

Directions

  1. Put all ingredients in a blender for 30-60 seconds, starting with the liquid first.
  2. Sprinkle some raw cacao nibs on top for a little extra crunch!

A few notes about the ingredients:

  1. We buy Silk Vanilla Unsweetened almond milk when we don’t make it ourselves. Making it is surprisingly easy though!
  2. The fiber and omega-3 fats from the flaxseed help to fill you up and give your body a dose of brain and heart healthy fats.
  3. When we buy peanut butter, we buy brands that have no added sugars, oils or salt. Ideally, the only ingredient on the ingredient list will be “peanuts.”
  4. If your dates are hard, soak them in warm water for 10 minutes to soften them up before blending. It will make it easier.

Zucchini Basil Pesto Sauce (Watch Me Make It!)

I LOVE pesto. It’s my favorite Italian sauce for pasta, veggies, and even chicken.

Anything with basil and garlic in it is bound to taste good, right?

Most pesto sauce recipes are loaded with oil, cheese, and pine nuts, all of which can be clogging to our bodies if eaten in excess. I’m a huge fan of pine nuts and love the way they taste, but there are one of the most expensive nuts you can buy, so I wanted to share a recipe that uses walnuts instead.

This recipe also includes a “surprise” ingredient that you’ve probably never seen in pesto…zucchini!

Zucchini adds creaminess to the sauce and boosts its nutrient content.

I like serving pesto over top of zucchini pesto noodles AKA “zoodles.” (click the link for a “how to” demo!).

Oil-Free Zucchini Basil Pesto Sauce

The completed pesto sauce!

Ingredients

1 cup diced zucchini (no need to peel it!)
1 handful fresh basil leaves (about 3/4 oz.)
2 garlic cloves (the recipe called for 4 cloves, but I found that to be wayyy too much, so I would use 2)
½ cup raw walnuts
3 tablespoons water (the recipe calls for a 1/4 cup, but I found that slightly less – 3 T works best)
2 tablespoons fresh lemon juice
1/2 teaspoon sea salt, or to taste

*I also added in about 2-3 tablespoons of nutritional yeast to give it a little more of a “cheezy” flavor, but you can taste test it yourself and decide whether or not you want to add that in!

Click here for the super simple directions from one of my favorite bloggers and fellow health coaches, The Detoxinista. You can also watch my How To video below!

http://youtu.be/QgHpa5nIcPA

Healthy Snack Alert! 5-Ingredient No-Bake Fig Newton Bites

My hubby loves Fig Newtons.

His claim to fame? He can eat them by the sleeve. Quite a feat!

After checking out the ingredient list on a package of Fig Newtons, including the whole grain ones we used to buy, I decided I wanted to find a healthier way to create a similar taste and texture but without all of the processed ingredients in the traditional fig cookies.

We make it a priority to nourish ourselves with high quality, wholesome food because we want to be around for each other in as optimal health as possible for a long time 🙂

How do I decide whether or not something is a nourishing food choice? I’ve found it helpful to follow some of Michael Pollan’s food rules:

  1. Avoid food products containing ingredients that a third-grader cannot pronounce.
  2. Avoid food products that contain more than 5 ingredients.
  3. Avoid food products containing ingredients that no ordinary human would keep in a pantry.

I love the simplicity and directness of his common sense approach to eating! 

The core ingredients in this Fig Newton bites

The core ingredients in these Fig Newton bites

Now, back to the bites!

These Fig Newton Bites are awesome for a few reasons:

  • Only 5 ingredients
  • No baking required
  • They taste like the filling of a Fig Newton!

You could easily whip up this simple recipe with your kids in a matter of minutes. The combination of protein, fiber, healthy fats and a touch of salt makes these a great choice for a filling and healthy snack.

My husband, Bill, has been bringing the bites with him as a snack to the summer camp where he works as a counselor. In fact, the other day he gave one to another counselor, who responded by saying he was surprised by how good they tasted…and has asked for more each day Bill brings them!

5-Ingredient No-Bake Fig Newton Bites

IMG_5208

Ingredients

  • 3 cups dried figs (remove the hard stems)
  • 1 cup walnuts halves
  • ¼ cup flaxseed meal*
  • 1 tablespoon pure vanilla extract
  • ½ teaspoon sea salt

You can find flaxseed meal in the gluten free aisle of any grocery store, online, or at Home Goods!

Click here for the full recipe from another blogger, The Lemon Bowl.

Page 13 of 15

Powered by WordPress & Theme by Anders Norén