Pumpkin seeds, pumpkin soup, roasted pumpkin, pumpkin fudge, pumpkin-spiced anything. If I can find a way to get pumpkin or pumpkin pie spice into it, I will.
I’ve made this delicious pumpkin spice dip multiple times over the past few weeks and have been trying for the past two years to come up with a pumpkin energy bite recipe.
It took me a half a dozen attempts before coming up with this winner 🙂
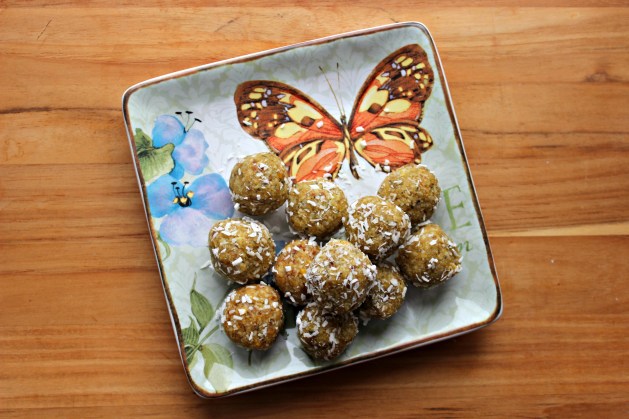
I like to think of these no-bake bites as triple pumpkin bites because I used just about every component I could – pumpkin seeds, pumpkin pie spice, and a teeny bit of pumpkin puree.
They’re like a taste of fall in every bite – pecans, cinnamon, nutmeg, ginger, clove, and all things pumpkin.
Pecan-Coated Pumpkin Spice Bites
For a sweet and salty, chewy and slightly crunchy bite of fall, you have to try these no-bake bites!
Coating
1/4 cup pecans
1/2 teaspoon cinnamon
Dough
1 cup pecans
1/2 cup raw pumpkin seeds (shelled)
1.5 teaspoons pumpkin pie spice
1/2 teaspoon cinnamon
1/4 teaspoon fine grain sea salt
1/2 teaspoon vanilla extract
1 cup Medjool dates
2 tablespoons pumpkin puree
Combine 1/4 cup pecans and 1/2 tsp cinnamon in food processor until small hunks of pecan remain. Pour into medium bowl and set aside.
Combine pecans, pepitas, spices and salt in a food processor and pulse until it reaches a fine meal.
Add vanilla, dates and pumpkin puree and process until everything is combined. Remove from food processor and shape into a large ball.
Tear off 1-inch hunks and roll into a ball between your palms. Roll ball in pecan mixture and store in glass container in the fridge. You can also freeze them!
Jenna, one of the participants from a recent cooking class I taught about healing foods, had this to say about today’s recipe:
“Everyone in my family thought the cauliflower mash was potatoes!!!! They were super creamy.”
Jenna is in high school but is going to be doing big things in the healing foods space in the coming years, as she pursues studies in nutrition in college. Keep your eye out for her!
I’ve shared the base of this recipe before in this post for Roasted Garlic Cauliflower Mash but put a new spin on it by topping it with mushrooms, a food often used as a stand-in for meat because of their chewy texture.
Mushrooms are immune-boosting, cancer-fighting powerhouses and don’t get nearly enough love in our kitchens and on our plates.
I hated mushrooms for most of my life because I was too grossed out by what they looked like to even be open to trying them. Now, I’m a big fan, whether they are chopped up in a soup or stew, roasted, or served sautéed like they are in this dish.
You can serve this up as a Thanksgiving side dish. It’s a great way to upgrade your plate without sacrificing flavor. With a whole head of roasted garlic and a tablespoon of fresh thyme in the potatoes along with a generous sprinkling of oregano on the mushrooms, no one will complain that this dish lacks flavor.
Next step? Come up with a sauce to top it off 🙂
Simply Sautéed Mushrooms
Ingredients
1 (8-ounce) package cremini (baby Portobello) mushrooms, wiped clean and sliced
2 tablespoons avocado oil, coconut oil, or extra virgin olive oil
1/2 tsp sea salt
Black pepper, to taste
1⁄2 tsp dried oregano
Directions
Heat oil in a large skillet over medium high heat until oil shimmers.
Add mushrooms to pan, evenly coating them with oil. Spread into a single layer and let cook for 5-6 minutes.
Add salt and pepper, stir and cook 5-6 minute more, until mushrooms begin to brown and soften. Toss with oregano and serve.
Soups, stews, chilis, squash, apples, Thanksgiving, and
…Brussels sprouts!
I’ve always liked certain vegetables that other kids didn’t like, including Brussels sprouts, but I think the Parmesan cheese shower I coated them with as a kid helped hide the taste. I think I liked the taste of the cheese…not so much the bitter taste of the overcooked Brussels sprouts.
Brussels sprouts get a bad rap because most of us have only ever eaten them steamed or boiled to death, which releases all of the not so pleasant smells most of us associate with Brussels sprouts.
BUT it doesn’t have to be that way? Brussels sprouts don’t have to be awful.
They can be incredibly delicious, especially when roasted, sautéed, or prepared raw, which is what we’re doing for today’s recipe. I first served this dish at a Healing Foods cooking class I taught in Baltimore recently, and it was a hit.
It gave me an excuse to use the food processor, which I demo’d on a Facebook live video. Using a food processor is SO MUCH FASTER and more efficient than chopping things like Brussels sprouts by hand.
The brand I recommend and have had the most success with is Cuisinart. I have an 11-cup style and a 14-cup style, and the 11-cup is sufficient for most things I do on a daily basis. You can find the best deals on their food processors on Amazon.
Brussels sprouts are in the cruciferous veggie family, which includes all-stars like broccoli, cauliflower, cabbage, arugula, collard greens and kale.
If you’ve always been a Brussels sprouts hater or skeptic, I encourage you to give this recipe a try. Serve it up to family and friends – I bet they’ll never know they’re eating Brussels sprouts!
Shredded Brussels Sprouts Salad with Walnuts
Ingredients
1 pound Brussels sprouts, ends trimmed
1/4 cup lemon juice (about 1.5 lemons)
Zest from 1/2 lemon
1/2 tsp coarse sea salt
1 tsp Dijon mustard
1 tsp 100% pure maple syrup
1 clove garlic, peeled and grated or finely minced
1 shallot, finely chopped
1/4 tsp black pepper
1/3 cup extra virgin olive oil
1/3 cup walnuts, lightly toasted and chopped
1/4 cup naturally sweetened cranberries (optional)
Directions
1. Working in small batches, place brussels sprouts in feed tube of processor fitted with shredding blade. Pour shredded Brussels sprouts into large bowl.
2. Whisk dressing ingredients (lemon juice through black pepper) together starting with the lemon juice, streaming in the olive oil last. Toss with brussels sprouts to coat evenly. Add more dressing if needed. To soften Brussels sprouts, refrigerate salad at least 30 minutes.
3. Top with walnuts and dried cranberries.
This salad will hold up well for a few days in the fridge 🙂
Do you have any favorite Brussels sprouts recipes? Feel free to share them below!
We’ve been making the most of the last days of summer and have spent just about every weekend and multiple nights a week hanging out with friends and family.
We also went to the Zac Brown Band concert on Friday night with thousands of other people, and it was AMAZING! I highly recommend seeing one of their shows if you get a chance. Their music is fun, upbeat, and makes you want to dance!
Because of all of this, I’ve really felt like a little social butterfly lately…and I’m loving it!
As someone who used to prefer being alone over being with people, I’m enjoying all of the socializing we’ve been doing. One of the commitments my husband, Bill, and I made at the beginning of the year was to be more intentional about spending time with friends and other couples, even during what is often a busy week.
Why the focus on so much more social time?
In his book Wellbeing, Tom Rath writes about the importance of social time in reducing our stress and worry and boosting our wellbeing. To have a thriving day, we need 6 HOURS of social time. That includes time at work, home, with friends, talking on the phone, and even sending email (scrolling through Facebook doesn’t count) – anything that gives us an opportunity to directly connect with another human being. If six hours sounds kind of daunting, even three hours of social time cuts your chances of having a bad day to 10%. That’s reason enough for me to be more social!
We had a socially-packed day this past Sunday and easily hit the 6-hour mark by spending a few hours at church in the morning, going to a friend’s party in the afternoon, and visiting my in-laws that evening.
The party we went to on Sunday afternoon was a potluck-style party, so I decided to bring a new recipe that I had first taste-tested with my friend, Jeanne, on Friday night.
I was inspired to make this recipe when I was munching on the Tomato Basil version of Chickpeatos, one of my favorite snacks and a great substitute for croutons.
“Hmmm, wouldn’t it be great to combine those flavors into a salad?”
So, off I went to experiment with a combo of sundried tomatoes (oh my gosh, so good!), fresh basil and a base of quinoa.
This recipe looks like Christmas in a bowl with its red and green accents, so it’s a perfect way to celebrate the transition from summer to cooler weather. You’re going to love it!
Serves: 6-8
Ingredients
1 cup quinoa, rinsed in a fine mesh strainer
1/2 cup sundried tomatoes, chopped (I use these)
1 15-ounce can cannellini beans, drained and rinsed
1 cup fresh basil, thinly sliced
3 tablespoons fresh lemon juice
1/2 tsp coarse sea salt
Freshly ground black pepper, to taste
2 cloves garlic, minced
1/4 cup extra virgin olive oil (or oil from sundried tomatoes jar)
1/2 cup Watusee Foods Tomato Basil Chickpeatos
Directions
Combine 1 cup quinoa with 2 cups water in a medium pot and bring to a boil. Reduce heat to low and cover. Cook for 12-15 minutes or until almost all of the water is absorbed. DO NOT STIR QUINOA. Remove quinoa from heat and leave covered for 5 minutes to steam. Remove lid and fluff with fork. Set aside to cool.
Whisk lemon juice, salt, pepper and garlic together, then whisk in oil.
In a large bowl, toss quinoa with sundried tomatoes, beans, and basil with dressing and top with Chickpeatos.
I love the no-bake bites because they’re packed with an energy-boosting combination of protein, fiber and healthy fats, and the possibilities for flavor combinations are endless! I’ve made about a dozen different versions of these little bites, but I wanted to try something different with this recipe.
Because of the warm weather, I’d been enjoying this Caribbean Island Breeze smoothie with frozen mango and was inspired to make a no-bake bite using some of the same ingredients.
I’ve taste-tested these little gems with over a dozen people, and they’ve been a hit each time! With sweet mango, tart lime, creamy coconut, and a zing of ginger, these bites are full of flavor and fun to eat.
You’re going to love them 🙂
Tropical Mango Lime Coconut Balls
Yield: 32-36 balls
Ingredients
1 cup raw cashews
2 cups + 1/4 cup shredded coconut
1/3 cup hemp seeds
1/4 tsp + pinch fine grain sea salt
1/2 tsp grated ginger root
1/2 cup dried mango, softened slightly in warm water for about 10 minutes, patted dry with a paper towel, then coarsely chopped
1/2 cup Medjool dates, pitted and coarsely chopped
zest of 1 lime
Directions
Put cashews, 2 cups shredded coconut, hemp seeds and sea salt in the food processor and process (about 30 seconds) until it reaches a coarse meal.
Add remaining ingredients to food processor and process until evenly combined. You may need to scrape down the sides a few times.
Roll into 1-inch balls and roll in shredded coconut. Freeze or refrigerate in a glass container.
Summer is full of vibrant colors and bold flavors. I just love this time of year! Today’s recipe highlights one of my favorite summer herbs that is in season right now and seems to be in everything.
Basil.
I had some basil leftover from making this Basil Walnut Pesto and wanted to try something new and simple, so I decided to add it in to a basic hummus recipe.
We served it to our friends Lisa and Brody, and their son Beckett, at a recent dinner at our house…and everyone loved it! Bill brought it to school this week for a back-to-school potluck, and it went over well there, too.
The recipe starts with the basic hummus ingredients – chickpeas, garlic, tahini, lemon juice and olive oil – and upgrades it by adding in an underrated but super potent herb packed with health-promoting benefits.
Its flavonoids protect our cells from damage and help protect our DNA
The oils in basil leaves have strong antibacterial properties, naturally reducing the likelihood of contracting a food-borne illness
Contains anti-inflammatory compounds that can provide relief for anyone with inflammatory conditions like arthritis or inflammatory bowel conditions
Rich in Vitamins K and A, which act as powerful antioxidants that protect our heart
Basil Pesto Hummus
Ingredients
2 cloves garlic, minced
1 15-ounce can chickpeas, drained and rinsed
3 tablespoons tahini
1/4 cup fresh lemon juice
2 tablespoons water
3/4 teaspoon sea salt
1/2 cup fresh basil leaves, packed
2 tablespoons extra virgin olive oil
Directions
Put garlic, chickpeas, tahini, lemon juice, water, and sea salt in the food processor and process until evenly combined. You may need to scrape down the sides. Add basil leaves and process again.
Stream in olive oil through hole at the top of the food processor and run for about 60 seconds until smooth. It may seem a little loose, but if you put it in the fridge to set, it will thicken. If needed, add water, 1 tablespoon at a time, to thin it out.
Store in the fridge in a glass container and serve with raw veggies or chips.
After spending two weeks in upstate New York and the Pacific Northwest for vacation, Bill and I were both looking forward to being home.
We hadn’t been home for 48 hours before I was busy experimenting with new recipes. This one turned out to be a big hit with my husband’s men’s softball team (and their fans!).
I’ve made about dozen different recipes for no-bake energy bites, so I was trying to come up with a flavor combo I hadn’t tried before.
Sooo, I tried apple pie in August…why not? 🙂
Our friend, Matt, said these were the best things I’ve ever made, so I knew I had to share the recipe with all of you…and the quick video for how to make it. My husband, Bill, has been a BIG help making techie things like this happen.
Enjoy!
Ingredients
1 1/2 cups gluten-free rolled oats
1/2 cup walnuts
1/2 cup almonds
2 teaspoons ground cinnamon
1/4 teaspoon ground ginger
Pinch nutmeg
1/4 teaspoon sea salt
1 teaspoon vanilla extract or vanilla powder
1/2 cup apple, peeled and chopped (Granny Smith works best)
1/4 cup raisins
3/4 cup Medjool dates, pitted (DON’T use deglet dates…they’re not as chewy!)
1/4 cup shredded coconut (optional)
Directions
Add oats, walnuts, almonds, spices, and salt to the food processor and process for about 20-25 seconds or until it reaches a coarse meal.
Add the vanilla, apples, raisins, and dates, and process until it forms a ball. You may have to stop the processor, break apart the dough chunks and process again a few times to blend it all together.
Roll dough into 1-inch balls and roll in shredded coconut. Store in fridge or freezer.
One of my favorite parts of my job is spending time with employees and showing them how delicious and doable it is to eat well. I love the look of surprise on their faces and the comments they make when they try something they assumed wouldn’t taste good.
For a recent cooking demonstration with a client in DC, we focused on beauty-boosting foods – food packed with colors, vitamins, minerals, antioxidants, and other anti-aging nutrients and benefits.
We started with this Tropical Breeze Smoothie and then made the salad below for our main course, followed by my 5-minute chocolate avocado mousse topped with blackberries for dessert. Everyone had a great time and raved about the recipes.
To be totally honest, I came up with this salad the day before the class when I was in DC and eating my lunch from Chop’t, a salad place at the train station. I was admiring their seasonal Greenmarket Grain Bowl made with radishes, cucumbers, a mix of lettuces and a lemon basil vinaigrette.
Since the focus of the demo I was teaching the next day was about anti-aging, beauty-boosting foods, I knew that was the inspiration I needed to come up with this recipe. The good news is that you don’t HAVE to use these exact ingredients – just use a variety of vegetables that are in season and serve them with a yummy dressing, like the pesto one we made.
This particular recipe would be the perfect pairing for an ionic foot detox. Want to learn more about the potential health-boosting benefits of this unique detox treatment? Take a look at this guide to foods to help detox with ion cleanse. As with any health-related matter, always do your research before embarking on any detox plan.
Here are the health benefits of some of the ingredients we used according to nutritionist, Kimberly Snyder, in her book, The Beauty Detox Foods.
Cucumbers: This is one of the top beauty-boosting foods we can eat. Cukes are packed with enzyme-charged water, B-vitamins and electrolytes to help us flush out the kidneys, reduce bloating and build radiant skin from within.
Radishes: Help cut and dissolve mucus in the digestive tract, so nutrients can flow freely throughout the body. They are in the mustard family and act as cleansers and detoxifiers in our body.
Scallions: Onions contain compounds that stimulate the production of the most important antioxidants the liver uses for detoxification (glutathione). They also contain quercetin, an antioxidant that counters the effects of premature aging.
Zucchini: Rich in antioxidants and other anti-inflammatory compound, vitamins and minerals, this summer squash is not only good for our bodies but it’s also fun to prepare when you use a spiralizer.
To make things a little more exciting than usual, we spiralized the zucchini and diced and sliced everything else. (This is the spiralizer I have). We topped it off with a pesto sauce that I usually serve with pasta or as a topping for cucumber slices as an appetizer. You can thin it out a bit by adding a little more oil or water and use it as a dressing. We just took it straight from the food processor and mixed it in.
The finishing touch was a sprinkling of Tomato Basil Chickpeatos (my FAVE roasted chickpeas). The bag was gone in a matter of minutes. I use them instead of croutons, and the rest of the crew is on board with that idea now, too, which is awesome to see!
Ingredients
1/2 pound mixed greens
2 zucchini, spiralized (or cut into thin strips)
1 bunch scallions, chopped
2 cucumbers, chopped
1 bunch radishes, thinly sliced
1 package of sprouted beans (we used lentil sprouts from MOMs)
1 cup Tomato Basil Chickpeatos
1/2 cup basil walnut pesto
Did you know that the same foods that support our heart and help it heal can also boost our mood? Foods that help one part of the body tend to be good for others as well.
During a recent Heart Healthy Happy Hour hosted by the Institute for Integrative Health in Baltimore, I had the privilege of hearing Dr. Michael Miller, preventive cardiologist, speak about the importance of taking care of our heart, so we can feel good, be well and live longer. For a recap of the top three tips he shared (and a video that will make you laugh until you cry), check out the last blog post here.
To enhance the presentation and bring it to life, his wife, Dr. Lisa Miller, a podiatrist and chief recipe creator, showed everyone how to make the two recipes I’m sharing with you in today’s post. They are perfect for summer, refreshing, colorful and delicious!
During his presentation, Dr. Miller highlighted some of the top 50 heart-healing, mood-boosting foods, and the recipes prepared highlighted nearly a dozen of those ingredients. For the health benefits of these ingredients, check out my last blog post.
As with all of the recipes on my blog, both of these recipes are dairy-free and gluten-free. The first is raw and both are vegan. Enjoy 🙂
Raw Blueberry Cashew Gelato
Ingredients
1/4 cup raw cashews (preferably soaked overnight in salted water)
1 cup frozen blueberries
2 tablespoons maple syrup
1/2 tsp maca powder (optional)
Directions
Drain cashews (if soaked) and discard soaking liquid.
Place all ingredients in blender as listed and blend until smooth and uniform resembling gelato/ice cream. A high-powered blender works best for this. Add a tablespoon spoon or so of almond milk if it isn’t blending easily enough but keep it minimal so the dessert stays thick.
Pour into pretty cups and serve immediately.
Top with your favorite granola or a sesame tahini cookie, if desired.
Sesame Tahini Cookies
Ingredients
1 1/4 cup almond flour
1/4 tsp sea salt
1 tsp baking soda
1/3 cup maple syrup
1/3 cup tahini
1 tsp almond extract
1 tablespoon olive oil
1/2 cup sesame seeds
Directions
Preheat oven to 350F.
In a large bowl, combine almond flour, salt, baking soda.
In a small bowl, blend tahini, maple syrup, almond extract and oil.
Blend dry and wet ingredients together.
Add in sesame seeds.
Form dough into 1” balls and flatten slightly.
Bake at 350F for about 8-10 minutes until lightly brown.
Once cool, you can can dip 1/2 of the cookie in melted dark chocolate and place in the fridge to harden. Otherwise, serve them as a side to the raw blueberry cashew ice cream!
What if meal prep and planning could be easier? Cheaper? Tastier? More nourishing?
During the typical work week when I have lots of presentations and meetings and spend a good amount of time in my car, one of the best ways to make sure I stay energized is to have nourishing meals readily available.
I was preparing to teach a cooking demo about Meal Planning Made Easy to a client in DC and shared how to make overnight oats and mason jar salads. I knew I wanted to add one more recipe into the mix. I thought about the types of meals Bill and I typically prepare during the week without following recipes and was inspired to create this recipe.
We tend to use recipe templates instead of always following a recipe line by line. In addition to the versatile overnight oats and mason jar salad recipes, grain bowls are another template we roughly follow when coming up with meals.
They’re easy to assemble. We toss together whatever veggies, grains and proteins we have and mix everything up with a homemade dressing (or whatever we have in our fridge!). We top everything off with chopped nuts or seeds to add some crunch.
In this Sweet Potato, Edamame & Quinoa Bowl, I combined a gluten-free grain (quinoa) with a fiber-filled roasted veg (sweet potatoes) and protein (edamame), a pop of color and greenery (scallions), and some crunch and healthy fat (cashews). I topped everything off with my favorite salad dressing of all time plus one of my favorite anti-inflammatory, digestion-loving, heart healthy ingredients – fresh ginger root.
My husband, Bill, and I love this dish so much that we’ve made it twice in the past few weeks. It can be served warm or chilled, and it’s lasted us for multiple dinners and lunches each time, which has saved us time and money.
We decided to repurpose the dressing from our favorite kale salad for this recipe and added minced ginger to boost the flavor even more.
Sweet Potato, Edamame & Quinoa Bowl
This dish has every texture and flavor you could want in a dish and is ALWAYS a crowd-pleaser!
Salad
1 pound sweet potatoes (chopped)
2 tablespoons extra virgin olive oil or avocado oil
1/2 teaspoon sea salt
black pepper (to taste)
1 cup quinoa (uncooked)
2 cups shelled edamame
1/2 cup raw cashews (lightly toasted and chopped)
1/3 cup scallions (chopped)
Creamy Ginger Tahini Dressing
3 tablespoons tahini ((sesame paste))
1/4 cup fresh lemon juice
1 tablespoon 100% pure maple syrup
1 tablespoon tamari ((gluten-free soy sauce))
2 tablespoons water
2 small cloves garlic (minced)
1 inch ginger root (peeled and minced)
3 tablespoons olive oil (extra virgin)
Preheat oven to 400F. Toss sweet potatoes with olive oil, salt and pepper. Roasted for 20-25 minutes until pierced easily with a fork.
Cook quinoa according to package directions. Spread quinoa on a parchment-lined baking sheet to cool and prevent it from clumping together. This last step is optional but really helps.
While quinoa is cooking, cook edamame according to package directions and then set aside.
Whisk dressing ingredients together in a small jar. Set aside.
Put cooled quinoa in a large bowl and add sweet potatoes, edamame, scallions, and cashews. Pour dressing over salad and toss to combine evenly. Add more sea salt and pepper to taste.
We use cookies to analyze traffic and improve your experience. Just wanted to let you know! Learn more about cookies and similar technologies here Okay, Got It!Read More
Privacy & Cookies Policy
Privacy Overview
This website uses cookies to improve your experience while you navigate through the website. Out of these, the cookies that are categorized as necessary are stored on your browser as they are essential for the working of basic functionalities of the website. We also use third-party cookies that help us analyze and understand how you use this website. These cookies will be stored in your browser only with your consent. You also have the option to opt-out of these cookies. But opting out of some of these cookies may affect your browsing experience.
Necessary cookies are absolutely essential for the website to function properly. This category only includes cookies that ensures basic functionalities and security features of the website. These cookies do not store any personal information.
Any cookies that may not be particularly necessary for the website to function and is used specifically to collect user personal data via analytics, ads, other embedded contents are termed as non-necessary cookies. It is mandatory to procure user consent prior to running these cookies on your website.


 I’ve shared the base of this recipe before in this post for