Category: How To Page 1 of 3

How I Recovered from Epstein-Barr Virus (EBV)

*The information in this article reflects my personal EBV journey. It is not intended to be medical advice, and I am not a health care practitioner, so I cannot advise on clinical recommendations. For those, please contact Kasia Kines (linked below) or a functional medicine practitioner.

Prior to February 2017, I had never heard of Epstein-Barr Virus (EBV). I had just been diagnosed with it after being sick for four months and not knowing why.

Fast forward seven months, and I know more than I ever thought I would about EBV because of the incredible coaching and guidance I have received from my nutritionist, Kasia Kines. An acute form of mono, EBV occurs more frequently in immunocompromised people, especially after periods of prolonged or intense stress or hormonal changes. The stress that had been accumulating in my life up to that point had nowhere else to go, so it took me down for the count.

As I wrote in a previous post, EBV has been a gift, even though it has been frustrating, confusing and overwhelming to deal with. Since sharing my story, multiple people have reached out to me asking me what I did to treat the virus and quiet it. The truth is, once you get EBV, you always have it, so once it’s been activated, you have no choice but to make some changes to your lifestyle. Most people have the virus in their body but never experience its activation. I had the perfect storm of circumstances come together to turn it “on”.

I’ve since learned how to calm it down, restore my immune system and get my energy back, and that’s what I want to share with you today. I’m forever grateful to my nutritionist, Kasia, for guiding me through this healing process. If you know someone struggling with EBV, tell them to contact her!

1) Rest

This was the most important thing I did.

And one of the toughest.

I had to prioritize sleep more than ever before. In the past, I could easily get a second wind at 10pm and just keep going until midnight reading, writing or watching mindless TV. After EBV, sleep was no longer a negotiable behavior. I consistently got about nine to ten hours of sleep each night in the three or four months following the diagnosis. My body needed additional time to recover and repair itself, so I gave it what it needed. Getting inadequate sleep suppresses the immune system and can trigger a cascade of hormonal changes, which can trigger EBV reactivation.

I also gave my body a break from movement. Any physical exertion at all seemed to set me back, so that meant no exercise for several months. Gentle walks and gentle stretching or yoga every now and then seemed to be okay, but my body needed to rest in every way, including physically. It took me almost six months to recover the vigor I once I had physically, which was frustrating but necessary. Since then, if I’m feeling mentally or emotionally run down, I am more aware, and I choose to be gentle with my body and movement on those days.

I love taking epsom salt baths, started reading even more than usual, wrote in my journal A LOT, listened to music, read my devotional, and was frequently diffusing calming essential oils like lavender and frankincense.

2) Slow Down + Create Space

Yup. This sucked. I didn’t want to do it. I thought I could keep being superwoman and superhuman.

EBV was the only thing that got my attention and made me take changes to my life seriously. Hormonal changes due to stress and even that time of the month can trigger EBV, so reducing stress is super important.

Prior to the virus, I would jam pack every day and week with as much excitement as I thought I could handle. Sometimes that meant four speaking gigs in one week, often with new content. I had no idea how exhausting that was for my mind and body, even though I love speaking. I had to email my boss and our CEO letting them know the seriousness of the virus and asking for support in terms of time and staffing. I knew I had to protect my calendar, which meant no more than two speaking gigs in any week. Period.

Slowing down meant saying “no” to people, late night socializing and exciting “opportunities”, so I could take care of myself and respect my need to create space in my life.

I’m still working on this, but I am so much more aware when I’m heading in a not so good direction that I catch myself before I go off the deep end. I also started seeing a therapist to start processing and working on some of the emotional and psychological factors that cause me to run myself into the ground. I know I have a lot of emotions inside that I have not acknowledged or addressed that send me into a spiral, and I am committed to getting to the root of them, too!

3) Connect to Community

As someone who finds it easy to be alone and crawl into a hole when I’m feeling down, I’ve learned in the importance of reaching out to people and bringing them into the muck with you. I can’t tell you the number of people who were praying for me, with me, and over me during this time.

I felt like there was an army of love behind me, pleading for my healing.

There were multiple days when I was at an 8-session spiritual gifts training at my church and was so sick I just sobbed out of desperation and pain, and people weren’t repelled by it; they came closer to me. When I was at my worst, people were checking in on me, asking how I was doing, sending sweet text messages, and stopping by to see me. I’m so grateful for all of the people who loved me so well through this period of time.

If you’re going through a difficult illness, REACH OUT to people. ASK FOR HELP. BE VULNERABLE. It’s one of the best things I ever did and that lesson has stuck with me ever since. I feel closer and more connected to my friends and larger community than ever before.

What a gift.

4) Seek Therapy

One of the reasons I got into the position I did with my health was that I placed unreasonable demands on myself for years on end and didn’t listen to the signals my body was sending to me leading up to my diagnosis.

Partnering with a therapist – especially one who is a somatic therapist and trained in mind-body integration – has been one of the most helpful steps I’ve taken to heal from the ways of thinking and doing that compromised my health. Processing our thoughts, feelings and even past or recent traumas with an empathic, licensed clinician can be extremely helpful, healing and transformation.

Remember, disease often starts as dis-ease in the mind, body or soul that we ignore or suppress until our body has to shout so we will pay attention to ourselves. You can learn more about somatic therapy here. I also suggest checking out the books, The Body Keeps the Score and Permission to Feel, which are both on my recommended reading list.

5) Supplement***

Kasia was incredibly helpful and knowledgeable in this area. She was in the process of finishing her final PhD project for a degree in Functional Nutrition and had selected EBV as her topic of choice. Lucky for me! She put me on antiviral, immune-boosting, energy-restoring supplements, which I have listed below.

Exact dosages should be determined by a healthcare provider with experience with EBV.*** For that, Kasia has no equal.

  • Licorice Root Extract (NOT Deglycyrrhizinated Licorice): One of the strongest anti-viral foods out there, I took this every either in the form of tea or a capsule from Vital Nutrients. Licorice root is contraindicated for people with hypertension, as it increases blood pressure. My favorite tea brand is Buddha Teas Licorice Root tea. I buy it at MOMs Organic Market.
  • Selenium: strengthens and protects the nervous system; antiviral
  • L-Lysine: strong antiviral amino acid
  • NAC: anti-replication of the virus and cell system support (energy)
  • Vitamin D3 + K2: increases energy levels and immunity, boosts mood and balances hormones; antiviral
  • B-vitamin Complex: supports balanced moods, healthy energy levels, and the nervous and immune systems
  • Vitamin B12 (methylcobalamin NOT cyanocobalamin – read the label): strengthens the nervous system and increases energy
  • Omega-3 fatty acids: prime modulator of inflammatory hormones
  • CoQ10: a natural antioxidant synthesized by the body that can improve energy production in cells
  • Magnesium: anti-inflammatory for nerves; nerve calmer; reduces constipation
  • Vitamin C: strengthens immune system and flushes out EBV toxins from the liver
  • Vitamin A: immune system support
  • Turmeric: active ingredient curcumin helps strengthen the endocrine and central nervous systems
  • Probiotics: digestive system support. Make sure to get these from foods like naturally fermented sauerkraut (HEX Ferments, Farmhouse Culture, Bubbies brands). Otherwise, use a high quality probiotic with a variety of strains (at least 8 different kinds) and 10-50 billion CFUs.

A few other supplements and herbs I didn’t use that can be helpful are red marine algae, nettle leaf (get in tea form), 5-MTHF, lemon balm (tea form), elderberry, red clover, star anise, rose hip tea, cat’s claw.

***As with any health condition, especially one as serious as EBV, consult with a trusted health care provider. My choice would be Kasia!

6) Eat to Nourish and Heal the Body

Every bite I consumed was intended to calm the raging inflammation in my body and heal my digestive system. I was already dairy-free and gluten-free, which helped because gluten and dairy tend to be key triggers of autoimmune conditions and promote gut dysfunction. They tend to trigger EBV symptoms, too. I pretty much nixed sugar, alcohol, caffeine, corn (digestive irritant) and even eggs for a while because they can aggravate EBV, according to Kasia’s research.

Here are some of the main foods I consumed a LOT of because of their antiviral, anti-inflammatory, and gut-supportive properties.

Veggies: celery (whole plant and juiced), sprouts (I LOVE Potomac Sprouts Company sprouts), cilantro, spirulina, asparagus, spinach, artichokes, parsley, sauerkraut, fermented veggies, lettuces except iceberg, green beans, winter squash, zucchini, kale, sweet potatoes, cucumbers, fennel

Roots: garlic, ginger, turmeric (try this turmeric golden milk smoothie!)

Fruit: wild blueberries (try this blueberry avocado smoothie bowl), pears, bananas, red-skinned apples, blackberries, melons, raspberries, papaya, apricots, pomegranate, grapefruit

Other: coconut oil, bone broth, herbal teas made with licorice root, ginger, fennel, chamomile, nettle leaf, lemon balm, red clover or rose hips

That’s a wrap, my friends. I hope it helps you and anyone you know on a journey of healing autoimmune conditions or chronic illnesses like Epstein-Barr Virus.

Sending love and light to all of you!

*The information contained in this article reflects my personal EBV journey. It is not intended to be medical advice, and I am not a health care practitioner, so I cannot advise on clinical recommendations. For those, please contact Kasia Kines (linked below) or a functional medicine practitioner.
The Secret Ingredients for Anticancer Salads

I didn’t eat my first salad until I was in college.

I liked vegetables but just couldn’t get excited about a plate of raw ones and was always grossed out by condiments and anything besides butter and parmesan cheese being on my food, so salad dressings were out.

Fast forward to my 30s, and I am a salad fiend! I love them and do what I can to make them exciting, colorful and delicious.

My husband is a teacher and was telling me about a potluck they recently had at his school. One of the teachers wanted to go in on a salad with him, and they were going to bring the standard lettuce + tomatoes + carrots + cucumbers with ranch dressing.

Now, as a disclaimer, I believe that eating fresh, whole foods, especially vegetables, is a wonderful idea. But what if you could supercharge your salads with more medicinal, disease-preventive, feel good ingredients??

This video from nutritionfacts.org has gotten me to think differently about salads, and I think it will do the same for you. It also reveals the #1 anticancer vegetable, so check it out!

https://www.youtube.com/watch?v=8tAAehC4BYs

Based on that video, I thought I’d share the template that I use to mix and match ingredients when making salads. I still include all vegetables but ordered them based on how cancer preventive they are, so use this as a guide for upgrading your salads.

The key with keeping salads exciting is to use a variety of colors, textures, and flavors. Based on this list, you can come up with endless combinations of beautiful, nourishing and delicious salads!

  • Base: spinach, kale, arugula, Romaine, spring mix, watercress, Bibb lettuce, red leaf lettuce, green leaf lettuce, radicchio, bok choy, endive
  • Veggies: broccoli, cauliflower, shredded cabbage, shredded brussels sprouts, scallions, shallots, onions, leeks, fennel, celery, peppers, beets, radishes, roasted sweet potatoes and other root vegetables, cooked asparagus, sun-dried tomatoes, tomatoes, cucumbers, carrots
  • Super food add-ons: broccoli sprouts (Potomac Sprout Co. is my favorite!), lentil sprouts, bean sprouts, hemp seeds, goji berries, mulberries
  • Chopped herbs: basil, parsley, cilantro, dill, oregano, mint
  • Fruit: berries are my go to but sometimes apples, pears or peaches fit the bill! Avocados are a great substitute for cheese (and they’re a fruit!)
  • Fermented Food: chopped sauerkraut, fermented beets (Farmhouse Culture), or kimchi. Adding these to your salad will enhance digestion and leave you feeling less bloated.
  • Protein: lentils, chickpeas, black beans, pinto beans, cannellini beans, chicken, salmon
  • Crunch: roasted chickpeas (Chickpeatos and Saffron Road are my top two brands), sunflower seeds, pumpkin seeds, slivered almonds, chopped walnuts, pecans or cashews
  • Dressing: check out over a dozen dressing recipes below, most of which include the all-star ingredient – GARLIC! My favorite brands of store-bought dressing are Tessemae’s and Bragg’s.

In the next post, I will be sharing 16 supercharged salad recipes, so you have some ideas for how to make this happen…and keep your salads exciting!

Apple Cinnamon Quinoa Breakfast Bowl

I just finished up teaching a two-part series about Healthy Meal Planning Made Easy at the Institute for Integrative Health. We had a great time and made some tasty recipes. I love showing how eating well can be easier, more fun, and delicious, and these classes are the perfect opportunity for me to do that.

I summed up my top healthy meal planning tips from week #1 in this post and shared links to over a dozen simple recipes, including the mason jar salad and tropical-inspired smoothie we made and sampled during the session.

In class #2, we focused on batch cooking, my favorite gadgets, the ultimate food storage guide, and my top tips for eating healthy on the go. Batch cooking is a technique of preparing larger quantities of simple foods that can be mixed and matched throughout the week. I love what Nutrition Stripped has to say about strategies for how do this in her Batch Cooking 101 blog post.

We kicked off the class with a sample of one of my favorite new packaged foods – Swapples – which is a new spin on a traditional waffle. Swapples are gluten-free, vegan, and paleo and can be used as the base of or topping for just about any meal. We tried the Tomato Pizza version, which I’d recommend dipping into marinara sauce!  For the “eating on the go” part of class, we also sampled one of my favorite real food snack bars – an Almond Cranberry Everbar.

We had fun playing with our food and making this easy 10-minute white bean, tomato and zucchini noodle saute. Two brave volunteers came up to help me spiralize the zucchini into noodles and did a great job! Want to get your own spiralizer? Check out this one.

Since one of the main concepts I wanted to introduce was batch cooking, we talked about how to use quinoa two different ways – one savory preparation and one sweet. If you prepare a big pot of plain quinoa (let’s say you cook 4 cups) at the beginning of the week, you can use it for a number of different dishes. If you’ve ever made a mistake cooking a batch of quinoa and ended up with a giant mass or unevenly cooked pieces, read this post that reveals the SECRET to cooking perfect quinoa…every time!

You can use it as the base of grain bowl like this Sweet Potato, Edamame & Quinoa Bowl that was a BIG hit. You could substitute it rice in a stir fry, toss it into a soup or stew or on top of a salad, or use it to make a breakfast bowl. Think of the quinoa as a substitute for oatmeal. Since it’s already cooked, this is a great way to save time in the morning. I’m going to experiment with other versions of this recipe that combine different ingredients, but this is a simple one to start with, so I hope you’ll give it a try!

Apple Cinnamon Quinoa Breakfast Bowl

This tasty and easy breakfast is a great way to use leftover plain quinoa.

  • 1 cup cooked quinoa
  • 1/2 cup almond milk
  • 1/2 cup unsweetened applesauce
  • 1/2 teaspoon cinnamon
  • 1 pinch ground ginger
  • 1/2 teaspoon vanilla extract
  • 1/8 teaspoon fine grain sea salt
  • 2 tablespoons almond butter
  • 1 tablespoon 100% pure maple syrup
  • 1/2 apple (diced)
  • 1/4 cup walnuts (chopped)
  1. Combine all ingredients except apple and walnuts in a small saucepan on the stove over medium low heat, stirring until heated through and quinoa begins to thicken, about 8-10 minutes.

  2. Pour into bowls and top with chopped apple, walnuts, and, if needed, a light drizzle of maple syrup.

You can also top this dish with pumpkin seeds, sunflower seeds, chopped almonds or hemp seeds.

6 Tips for Healthy Meal Planning Made Easy

Meal planning can feel overwhelming, intimidating and even repetitive and boring. It’s one of those things that we know we “should” be doing but rarely prioritize. Planning your meals and cooking from scratch gives you more control over what you’re putting in your body. It puts nourishment in your hands vs. someone else’s. When I consistently plan meals, I feel better, save money and time, waste less food and find that mealtime is less stressful because I know what I’m having ahead of time.

I’m about to finish a two-part series on meal planning at the Institute for Integrative Health in Baltimore. We had a great time coming together to talk about strategies for why and how to meal plan in a way that feels less intimidating and overwhelming.

I thought I’d pull together some of the top tips from the first session to support you in better meal planning! So, from getting a California meal delivery service to plate ratios to stocking up, here are my top meal planning tips:

1) Stock Your Pantry

If you have convenient, accessible, nourishing foods in your pantry, fridge and freezer, you’ll be more likely to eat those foods! It might sound too simple, but that’s what it takes. Start by cleaning out your pantry by tossing anything that is expired or isn’t supporting your health and wellbeing. Once you’ve done that, replace those items with nourishing ones instead.

I love this video from Whole Foods about how to stock your pantry. It includes all of our pantry staples. Check it out and notice which foods you tend to not have on hand. Canned beans, grains, and nuts and seeds are must-haves for us, in particular!

2) Spice It Up

Herbs and spices are an easy and inexpensive way to add variety and flavor to your food. We tend to shop in the bulk spices section at MOMs Organic Market, so we just get what we need for more obscure spices and continue refilling our glass jars for the ones we use on a regular basis. Here are our spice rack staples:

  1. Cumin
  2. Cinnamon
  3. Oregano
  4. Thyme
  5. Rosemary
  6. Sea Salt
  7. Black Pepper
  8. Chili Powder
  9. Curry Powder
  10. Turmeric
  11. Coriander
  12. Bay Leaves

3) Follow the 50/25/25 Plate Ratio

This is not a hard and fast rule, but it is something that helps me mentally map out a meal. Whether it’s in the form of a salad, soup, or side, half of my plate is made up of vegetables. Fruit is often something I snack on or put in my smoothies. Some of my favorite whole grains or starchy veggies are quinoa, brown rice, bean-based pasta (like Tolerant Foods), squash, spaghetti squash, etc. My protein source is either plant-based or animal-based, depending on my mood and what my body is craving at the time.

Notice how relatively small the protein portion is on the Harvard School of Public Health’s healthy eating plate compared to the typical American plate. Also, protein is in a variety of foods, including whole grains, vegetables, and beans, so keep that in mind, too!

4) Follow a Simple Process

I shared more details about our favorite cookbooks and meal templates in this post from a few weeks ago about What We Eat: A Peek At Our Weekly Meal Plan. I’m also a big fan of Precision Nutrition’s infographic about meal planning and how to combine spices in your meals. It’s super helpful!

  1. Look at your week and determine how many meals you’ll need.
  2. Look at what ingredients you already have in your pantry, fridge and freezer.
  3. Using a cookbook or online tool to find recipes that use those ingredients.
  4. Make a list of ingredients that you need to complete those recipes.
  5. Go grocery shopping.
  6. Wash, chop and cook veggies when you get home. Mark containers with masking tape, so you know what recipes they go with. Make bigger batches of recipe that will hold up well in the fridge for a few days ahead of time (grains, beans, stews, chilis, oatmeal, muffins, frittatas, roasted veggies).

5) Use a Recipe Template

I’m a fan of meal ASSEMBLY vs. meal planning because I like the idea of mixing and matching different ingredients to form a variety of dishes. The Environmental Working Group has a fantastic recipe guide arranged in template-style, and you can download the PDF here for free. Here are a few more of my favorite combinations:

Mason jar meals are one of my favorite meal templates. This is the Carrot & Chickpea Mason Jar Salad we made during the class. You have to try it!

https://youtu.be/M_sV1-ma5BA

6) Change Up Your Meals & Get Inspired!

As technology continues to expand, there are more meal planning and meal kit delivery service companies than ever before that make the process more fun and exciting.

Try a theme night focused around a certain topic like Meatless Monday, Taco Tuesday, What’s Left Wednesday (leftovers), Fiesta Friday, Souper Saturday, Salad Sunday, etc. If you know every Tuesday is tacos, you’re just changing up the ingredients but can reuse spices and core ingredients like wraps and shells.

I also encourage you to check out these options for meal planning services and meal kit delivery services.

Online Meal Planning Services

Meal Kit Delivery Services

How about you? Do you have any go-to meal planning tips? Feel free to share them below. I’ll be sharing more ideas about batch cooking, food storage and time-saving tips and tools in the next post!

White Bean, Tomato & Zucchini Noodle Saute

Pasta was my favorite food group growing up.

Whether it was Spaghettios, Beefaroni, or buttered egg noodles or angel hair, I LOVED all things pasta. I’ve come to upgrade my preferences these days and prefer protein and fiber-packed lentil pasta, brown rice pasta, or the easiest and most nourishing choice out there…

Zucchini noodles!

AKA “zoodles.” 🙂

You can buy zucchini noodles at a lot of grocery stores for convenience, BUT it’s so much cheaper (and way more fun!) to make them yourself. The simple gadget you use to make them is called a spiralizer.

I did a video about how to use a spiralizer when I JUST started making videos a few years, so don’t mind the less than stellar quality! I plan to update this with a better version soon, but it makes the point, so I’m keeping this one here for now.

https://youtu.be/XbLHyAY_KRI

You can eat the zoodles raw or lightly saute them, which is what I did for today’s recipe. If you eat them raw, I find that it helps to let them “sweat” on a paper towel for about 10 minutes before adding them to a salad, so they stay crunchy.

I had some garlic, cherry tomatoes and leftover cannellini beans that I wanted to use up, so I decided to toss all of them together to come up with this dish. Something like this takes just a few minutes to put together, so it’s convenient if you’re in a time crunch. Using fun kitchen toys like a spiralizer is also a great way to include your kiddos in the meal-making process. If you make cooking fun, they (and you!) will be more likely to want to do it instead of feel like you have to do it.

You can modify this recipe based on other ingredients you have on hand. Adding asparagus would be a great idea this time of year, since that is in season. Even though I didn’t use it this time around, I’m going to add some fresh basil the next time I make this dish because I think it will really make it pop and add another layer of flavor and color. I add leafy greens to my meals as often as possible!

White Bean, Tomato & Zucchini Noodle Saute

This quick and easy dish comes together in minutes and is a great way to highlight spring and summer veggies!

  • 2 zucchini (spiralized)
  • 2 tablespoons olive oil (extra virgin)
  • 2 cloves garlic (minced)
  • 1 cup cherry tomatoes (sliced in half)
  • 1 cup cannellini beans (drained and rinsed)
  • Pinch sea salt (to taste)
  • 1/2 teaspoon lemon zest (optional)
  • 1/4 cup fresh basil leaves (torn)
  1. Use your spiralizer to make zucchini noodles with your zucchini. Cut them with scissors, so you don’t have one long noodle.

  2. In a large saute pan, add olive oil over medium high heat. Add garlic and saute for 30 seconds or until fragrant. 

  3. Add cherry tomatoes, cannellini beans, and a pinch or two of salt and saute for about 5 minutes. Add zucchini noodles and saute for 2 more minutes or until heated through. Taste and add additional salt, if needed.

  4. Pour contents of pan into two bowls and top with basil leaves and lemon zest. 

I like to top any kind of pasta with my favorite paleo parmesan cheeze made with cashews and nutritional yeast. Here is the 3-ingredient recipe for that!

8 Tips for Eating Healthy on the Go

Would you be shocked to hear that almost 20% of meals eaten in the U.S. are eaten in the car?

Sometimes, when I share this statistic, people are surprised it’s not higher, but notice the word MEALS. We’re not talking about the occasional snack or latte. One out of every five meals eaten in this country are eaten in the car while we’re driving.

It’s as though we’ve made food one of our last priorities, settling for what is convenient above all else. In doing so, we’re bypassing the power of digestion by rushing through meals at the same time we’re operating a vehicle. We’re making quick feel-good food choices when we eat away from home, not realizing that we could just as easily pick a nourishing meal that tastes delicious.

I’m here to help. Because I’ve learned how to do it, no matter where I am. My hope is that applying these ideas will boost your confidence in making choices that nourish your body and brain and don’t break the bank. You’ll be able to walk away from the table feeling satisfied instead of stuffed.

It’s totally possible to eat well, even when you’re on the go as often as I am. Here are my top tips for how to make it happen no matter how busy your life is or where you’re traveling.

1) Become a Menu Detective

Restaurants use lots of creative language to get us to order certain items off the menu. But we can outsmart them if we know what those words mean. Take a look at the two lists below. One contains words that describe foods I do my best to avoid because of how I feel after eating them (not good) and the other is packed with adjectives that I opt for when I’m making a selection off the menu.

Eat This: Roasted, Baked, Braised, Steamed, Poached, Broiled, Grilled, Pan-Seared, Sautéed (ask for less oil), Stir-Fried (ask for less oil)

Not That: Creamed, Fried, Smothered, Tempura, Crispy, Breaded, Charred

If you see a menu item prepared using one of the “Not That” options, ask your server if they can prepare it using one of the “Eat This” options above. If the food is fresh, there should not be any reason why they can’t accommodate your request. If the restaurant has KIOSK technology to speed along the ordering process, they may enable you to exchange certain elements of your chosen meal for healthier ones.

2) Plan Ahead and Pack

Did you know that if you pack your lunch every work day and you work for 30 years, you would save $112,000?

That’s A LOT OF MONEY.

Remember back in grade school when you had a lunchbox and a thermos? They make them for adults! You can buy an inexpensive lunchbox at Target, Home Goods or on Amazon, among other places. I also bought a thermos that I use to put reheated leftovers in to keep them warm until lunchtime. I also pack smoothies, and the thermos keeps them cold for several hours as well.

This is the thermos I have. I like it because it has a folding spoon built into the lid!

Here are some ideas for what to pack in your lunchbox:

  • Oatmeal with berries and nut butter
  • Overnight oats like these three recipes from my blog
  • Smoothies (thermoses keep food cold, too!)
  • Leftover soups, stews, chilis (this is our #1 go to)
  • Mason jar salads like this one
  • Canned wild caught salmon with brown rice and sugar snap peas or served on top of a salad
  • Rotisserie chicken from the grocery store served with a salad and quick cooking brown rice
  • Bean/lentil and rice blends from Eden Organics (sold at MOMs Organic Market, Wegmans, Whole Foods, and Target). I like to add in some sautéed spinach
  • This simple Chipotle-style burrito bowl

3) Snack Smart

I also like to have snacks on hand for when I haven’t planned meals and need something to sustain me between meals. Here are a few of my favorites:

  • Fresh veggies with hummus, guacamole, almond butter (cut up celery & carrots and put in glass baking dish with water in fridge, swap water after 1 week = fresh veggies for 2 weeks)
  • Fruit: apples, clementines, pears, grapes; apples or pears with almond butter / peanut butter / sunflower seed butter squeeze packets
  • Trail mix like this recipe
  • Nuts and seeds (almonds, walnuts, cashews, pecans, pistachios, sunflower seeds, pumpkin seeds)
  • Crispy roasted chickpeas (brands like The Good Bean, Chickpeatos, Saffron Road, Biena)
  • Forager Project yogurt topped with Purely Elizabeth granola
  • Mary’s Gone Crackers pretzel sticks or crackers with Wholly Guacamole packets, nut or seed butter, or hummus
  • Some of my favorite brands of bars that use whole, real ingredients are Ever Bar, KIND (opt for 6 grams or less of sugar), Soul Sprout, Paleo Krunch, Rx Bars, Hemp Heart Bar. Ideally you want less than 10 grams of sugar along with some fiber and protein. My hubby’s faves are Epic Bars and Mighty Bars.

https://www.youtube.com/watch?v=hJ78NwTNb80

4) Know Where to Go

When you’re on the road and need to stop or are meeting someone for a meal, knowing where to go is half the battle. It sets you up for success to go to a place that serves nourishing food. I intentionally seek places that are farm to table or that prioritize using fresh ingredients. You can use the apps in Tip #5, but the ideas below should help you, too.

  • Hit up the salad bar or “to go” counter at a grocery store. Try Whole Foods Market (especially Health Starts Here options), Wegmans or Harris Teeter ($4, $6, $8, $10 meals). If we can find a Whole Foods while on the road, we know we’re golden.
  • Go global and try Indian, Thai, Greek or Mexican food. Other cultures tend to eat more colorfully than we do in the U.S. They also are much more liberal with flavorful herbs and spices, which can enhance a dish. As a gluten-free, dairy-free eater, I find that Indian or Middle Eastern restaurants are packed with lots of options I can enjoy!
  • Pick a place that lets you customize your order and fill your plate with lots of veggies. Try places like sweetgreen, Cava Grill, Chipotle, Qdoba, Roti, Chop’t, freshii, Baja Fresh, and Nalley Fresh.
  • Starbucks is my go to breakfast place because I can get steel-cut oatmeal with nuts. I sprinkle some cinnamon on it and often travel with packets of almond butter or sunflower seed butter that I squeeze and stir in to the oatmeal to make it creamier and heartier.

If you’re in the Baltimore area, check out my healthy Baltimore dining guide, which sums up my top places to eat in my hometown!

5) There’s An App for That!

When I’m traveling and don’t know where to go to find a healthy meal, I use a few apps on my phone. I wrote about each of them in this blog post, but thought I’d mention them while we’re here:

  1. Happy Cow
  2. yelp!
  3. Food Tripping
  4. Healthy Out
  5. Eat Well Guide

I highlighted the two I use most often. Happy Cow is great because it highlights plant-based options, which is how I eat, but yelp! is often more inclusive. When I’m searching in yelp!, I use words like “vegan, gluten-free, farm to table, organic, healthy” to find places that will align with my eating preferences.

6) Modify the Menu

Yup. Be that person.

The way I look at it, it’s your money and your body, so you can decide what you eat, so you feel the way you want to feel, even if you’re not cooking it yourself.

I look at the menu as a list of everything that is back in the kitchen. If I see a dish that has a side I don’t want but see another dish with one that I do (maybe roasted Brussels sprouts instead of mashed potatoes?), then I politely and graciously ask the server if they can swap them out.

Sometimes I create a meal from scratch using a variety of ingredients on the menu. I make sure I tip the server a bit extra and ask them to thank the chef. Almost every time, my request has been accommodated.

Remember, it’s YOUR body and YOUR money. Ask for what you want. The worst thing they will say is, “No.”

7) Upgrade Your Order

No matter where I am, I try to keep a simple formula in mind when deciding what to eat: 50% veggies; 25% starchy veg or whole grain; 25% protein (plant-based or animal). It helps me pick meals that are colorful and packed with antioxidant-rich foods. This plate from my health coach training is a visual of that. I opt for half the plate veggies vs. fruit, as most restaurants don’t serve my prefered fruit (berries) with meals.

Image from the Institute for Integrative Nutrition

Here are a few additional tips to help you upgrade the quality of your meal and make it more nourishing:

  1. Hold the bread. Ask for raw veggies instead. You are better than the cold, stale dinner roll!
  2. Start with a salad or broth-based soup
  3. Load up on veggies and ask to swap your starchy side dish for an additional side of veggies. Roasted veggies are my favorite!
  4. Ask for a veggie side dish as your appetizer. Roasted Brussels sprouts, anyone?
  5. Ask for vinaigrette on the side. See if they will give you lemon juice, red wine vinegar or balsamic vinegar and olive oil so you can make your own
  6. Add as many veggies as possible to a sandwich or burger and forego at least half of the bun. Lettuce wraps are all the rage these days!
  7. Make the best choices for condiments. Opt for things like guacamole, mustard, salsa, hummus, tahini, and chimichurri.

8) Be the Anchor

In his book, Eat Move Sleep, lifestyle expert Tom Rath shares a simple tip that has stuck with me ever since I read it.

The first person to announce what he or she is ordering sets the anchor for the entire group. If the first person ordering chooses a healthy option, it puts a little pressure on everyone else to do the same.

If you’re committed to nourishing your body with what you eat, be the first one to order when you go out to eat. Your decision will influence the rest of the people at your table. Maybe there are other people you’re dining with who were tempted to get a cheeseburger and fries. When they hear you place your order, they give it a second thought and instead order something that will nourish them and make them feel good for more than 10 minutes they’re eating it.

I typically look up the menu ahead of time if I’m going to a place I’ve never been. That way, I don’t even have to look at the menu when it comes and be tempted by something other than what I know what will make my body feel its best (and taste good, too!).

Give it a try the next time you go out to eat; be the anchor!

And, that’s a wrap! I hope those tips give you some ideas for how to better nourish your busy lifestyle no matter where you are.

Which one stuck with you the most? I love hearing from you!

6 Ways to Boost Your Immune System Naturally

It’s that time of year again…cold and flu season.

It’s funny how the flu is the only illness that gets a whole season named after it, isn’t it?

What changes this time of year that increases our susceptibility to getting sick? Are colds and the flu inevitable, or can they be prevented?

As someone who used to come down with bronchitis, sore throats, and sinus congestion multiple times a year, I know how inconvenient and uncomfortable being sick is. Over the past few years, the changes I’ve made to my lifestyle and diet boosted my immune system, so I rarely got sick and felt better than ever. Even my husband, an elementary school phys ed teacher, who is exposed to countless sick kids every day, stays well, too.

I can usually get through this time of year without getting sick, but this winter has been a tough one for me. I got sick – sore throat, feeling totally run down, and a bit feverish. Not the full-blown flu, but I felt pretty crappy. I am the worst patient and hate being sick! But my body was sending me a message that I wasn’t taking care of it, so I got run down as a result.

Looking back, I can attribute my weakened immune system to NOT doing all of the things I’ve outlined below on a consistent basis. When I’m following these steps, I don’t get sick. My immune system is strong and fights for me.

So, what are the secrets of those who stay well? What if we could naturally boost our immune system, so we could thrive through instead of simply survive this time of year? Can we do more to protect ourselves than solely relying on the flu shot and a bottle of hand sanitizer? Not that there’s any harm in getting a bottle of Hand Sanitizer Canada ready for when the sickness hits, but most of the medications we take just suppress symptoms but don’t get to the root of why we’re sick. They also interfere with our body’s natural healing process. And we all know washing our hands is certainly important, but…

We can do better.

Here are six tried and true steps you can take to supercharge your immune system and stay well in the winter.

1) Catch Some Zs

Lack of sleep (usually staying up to late) is the #1 trigger for me to get sick.

Though not the most glamorous piece of guidance, getting adequate, quality sleep is one of the best things we can do to boost our immune system. Our body uses sleep as a time to rest, repair and restore itself, so when we shortchange ourselves, we compromise our body’s ability to fight back. Sleep disturbances not only reduce our immune response but have also been linked to increased susceptibly to the common cold. One of the best things we can do if we start to feel like we’re coming down with something is to prioritize sleep and get a few extra hours of shut-eye. However, some people find that using immune system supplements could help boost their immunity so they can get over their cold or flu. That being said, some people can find it difficult to swallow supplements when they come in tablet or pill forms. Fortunately, there are now liquid vitamins and supplements which provide an alternative way to boost your immune system. You can learn more about liquid vitamins and supplements @ https://tropicaloasis.com/.

Since millions of people have trouble sleeping, try one of these tips to better sleep:

  1. Check out The Sleep Doctor, Dr. Michael Breus’s book, The Power of When, to understand how to optimize your daily activities and sleep based on what he calls your “chronotype.” Click this link to take a quick quiz to identify YOUR chronotype.
  2. Set your phone to Night Shift to reduce exposure to stimulating blue light. If you have an iPhone, go into Settings — Display & Brightness — Night Shift. I have mine set to turn on at sunset and turn off at sunrise.
  3. Take a warm bubble bath or lavender epsom salt bath. Taking a bath before bed raises our core body temperature. Stepping out of the bath drops our temperature, which stimulates the release of sleep-promoting compounds. The magnesium in the epsom salts have a calming, anti-anxiety effect, too.
  4. Set your room temperature to 65F. You know how hard it is to sleep in a room that is too warm. A cooler temperature promotes better sleep.
  5. Use the Calm app to find a soothing meditation or relaxing adult bedtime story to prepare you for rest.

2) Begin with the Gut

They might look like Cheetos, but these puffy tubes are actually bacteria. Did you know that bacteria cells outnumber human cells 10:1? That’s right. We’re mostly bacteria.

Because 70-80% of our immune cells are located in and around our digestive system, one of the first places we should focus on to boost our immunity is our “gut.” The bacteria in our gut play a crucial role in the development and maintenance of our immune system and our Western diet, rich in processed packaged foods, and the overutilization of antibiotics has been linked to gut dysfunction and imbalances in our gut bacteria.

Increasing our consumption of prebiotics and probiotics is one way we can boost our digestive health and, therefore, our overall health. Prebiotics are fermentable fibers that feed probiotic bacteria. Sources of prebiotic foods include buckwheat, chicory, burdock root, onions, garlic, asparagus, green tea, and blueberries, to name a few. We also want to increase consumption of traditional probiotic-rich foods like miso, natto, kimchi, sauerkraut, and kefir to promote a healthy gut.

Another option is to take a probiotic supplement. If you do, make sure you go with one that is high quality and proven effective. This review of the top probiotic supplements should help you.

3) Supplement with Vitamin D3

Vitamin D is a powerful immune system regulator. Some experts even suggest that the collective reduction in sun strength and exposure (one of our primary sources of vitamin D) this time of year is what sets most of us up for reduced immunity. Deficiencies in vitamin D have been linked to increased susceptibility to infection, colds and the flu, and many Americans are deficient in this immune-boosting nutrient.

The best form to take is vitamin D3. Most supplements are D2, so make sure you check and get D3. Recommendations vary, although the Vitamin D Council suggests 1,000 IUs (international units) for children and 5,000 IUs for adults daily. Vitacost is a great resource for supplements, including D3.

See your doctor to have your vitamin D level checked. It should be at least 30 ng/ml and closer to 50 ng/ml or more for optimal health and cancer prevention. Vitamin D is a fat-soluble vitamin, so it should be consumed with some source of fat for optimal absorption. Check out the chart below from the Vitamin D council. Live in Colorado and want to get your vitamin levels checked? Click to see Family Medicine csu health center hours and get a check-up booked in today.

4) Eat Your G-BOMBS

Chronic stress depletes our body of nutrients, so upgrading our nutrition to support our body is especially critical during this time. All of us have heard about the importance of having a colorful diet, but this catchy acronym from Dr. Joel Fuhrman puts a new spin on that age-old advice.

G-BOMBS stands for Greens, Beans, Onions, Mushrooms, Berries and Seeds. I’ve written in more detail about them here. These nutrient-dense foods are packed with anti-inflammatory phytochemicals, antioxidants, vitamins, and minerals that work together to supercharge our immune system. Leafy greens like kale, spinach, Swiss chard and cruciferous vegetables like broccoli, cabbage and cauliflower have antiviral and immune-boosting properties.

Compounds from onions and other members of the allium vegetable family, like garlic, leeks, shallots and scallions thin mucus and have been found to have anti-asthmatic and antibiotic effects. Beans are rich in prebiotic fiber that helps feed the good bacteria in our digestive system. I eat beans almost every day. Believe it or not, mushrooms are also a significant immune booster and have strong antiviral and antibacterial properties. For more about the power of mushrooms, check out the TEDTalk below.

Whether you enjoy them in salads, smoothies, soups, stews, stocks, steamed or sautéed, eat your G-BOMBS to boost your immunity. Most recipes on this blog are packed full of G-BOMBS. Here are a few GBOMBS-rich soup recipes.

5) Chill Out

This time of year is characterized by heightened levels of stress from travel, holiday shopping, reduced exercise, increases in consumption of alcohol and sugar-laden foods, family get-togethers, time management, and, for many, holiday blues and depression. Do what you can to increase your resiliency to stressors because stress significantly suppresses our immune function.

If you want to thrive through the winter, make time for relaxation and fun, whether it takes the form of meditation, yoga, massage, a mani/pedi, dancing, taking a day off from work, a soothing epsom salt bath or calling a friend, going on a date, playing a game, or spending time in nature, even if it is chilly outside.

You can also just watch this video and search “laughing babies” on YouTube for instant stress relief!

6) Move Moderately

As the weather gets colder, we tend to spend more time indoors and less time moving. Moderate exercise may have a protective effect on the immune system, while excessive exercise and overtraining can depress our immune response.

I love this infographic from Precision Nutrition that gives all the details on exercising when you’re sick.

If you feel like you’re coming down with something, mild to moderate movement is the way to go. Try a dance class like tai chi, yoga, dancing, Nia,or go for a brisk walk, jog or indoor swim. My favorite place to take classes like this in Baltimore is Movement Lab.

So, there you have it! If you want to stay well this winter, thrive instead of survive, and feel the best you’ve ever felt, follow these tips to supercharge your immune system.

Is there anything I’m missing? Any tips you swear by that help you stay well? I’d love to hear from you in the comments below!

8 Easy Ways to Upgrade Your Thanksgiving {+ Dozens of Recipes!}

I have so many positive memories of Thanksgiving from growing up – the giant glazed donuts from Woodlea Bakery we got every year for breakfast, watching the Macy’s Thanksgiving Day Parade, and helping my mom peel apples for her signature three-apple pie.

We never did anything too extravagant, and it was usually just the five of us – my parents, me, and my brother and sister – but Thanksgiving was a special day in our house. Now that I’ve grown to love cooking so much, it’s become my second favorite holiday after Christmas. Some of my favorite crowd-pleasing, gluten-free, dairy-free recipes to make are gluten-free stuffing, pecan-crusted sweet potato casserole, roasted garlic cauliflower mash, and pumpkin cheesecake.

I wanted to offer up some helpful tips and tricks to support you on Thanksgiving Day. Most of the websites that give tips for Thanksgiving just tell you to use healthier versions of your favorite staples, avoid going back for seconds, and watch your alcohol consumption. While I agree that all of those recommendations are useful to some extent, I’m here to offer something different, something more inviting and life-giving.

Happy Thanksgiving, my friends! 🙂

thanksgiving-cover

1) Be Present & Enjoy It

Thanksgiving is meant to be a time to come together with friends and family to celebrate the abundance and blessings in our lives. It’s easy to get caught up in the busy pace most of us keep throughout the year. For at least this one day, we can choose to pause, reflect, and be present. Enjoy the day. Savor the meal.

Part of being present means being aware of our body. If you’re going to eat something, OWN IT. Notice how it smells, tastes, and feels. Notice the signals your body sends you. Are you really hungry or do you just want something to do? Your body will let you know when it is no longer hungry. Pay attention to it. Take a break. Save the leftovers.

2) Eat Breakfast

When we know we’re going to be eating a lot later in the day, many of us will skip breakfast or eat too little early in the day to “save up” for the afternoon. Instead of skipping breakfast, which will lead to overeating later, have a nourishing breakfast to start your day. Try one of these 25 breakfast recipes, like this pumpkin spice oatmeal or this quick and easy black bean scramble.

3) Upgrade Your Recipes

All of us have family favorites that aren’t likely to be replaced anytime soon, but I invite you to give a new side dish recipe a try. I put together a collection of nearly 30 nourishing, delicious, and upgraded Thanksgiving recipes in this blog post. You won’t want to miss the maple-roasted Brussels sprouts, shredded Brussels sprouts salad, pumpkin spice dip, pecan-crusted sweet potato casserole, or pumpkin cheesecake.

You can also check out this post by Adventures of a Sick Chick for a list of paleo Thanksgiving recipes, featuring my gluten-free stuffing!

brussels-salad-angle

Shredded Brussels sprouts salad with walnuts

4) Taste the Rainbow

Most Thanksgiving plates look pretty one-note with lots of browns and whites and a little bit of green or orange. Focus on filling your plate with as many colors as possible. This sweet potato casseroleshredded Brussels sprouts salad, and butternut squash and quinoa harvest salad will all add color to your plate!

The more colors you have, the more fiber is on your plate, the fuller you will feel, and the more nourished you will be. If you have kids, encourage them to count the colors on their plate and celebrate who gets the most.

5) Reallocate Your Plate to 50 / 25 / 25

That’s the ratio I recommend to “up” the nutrition of your plate. Half of the plate filled with vegetables (i.e., greens, salad, Brussels sprouts, broccoli, cabbage, etc.) with some room for fruit, 25% protein (i.e., poultry, meat, seafood), and 25%  fiber-rich starch (i.e., sweet potatoes, squash, corn, grains). I’m a big advocate of the Harvard School of Public Health’s Healthy Eating Plate below, which is a visual representation of the 50/25/25 ratio.

harvard-healthy-plate

6) Slow Down

I hear a lot of people (me being one of them!) say things like, “But you don’t understand, it’s just that I LOVE food.” It’s given as a reason why we eat so much. Here’s something to consider from author, Geneen Roth, one of my favorite writers and truth tellers:

When you love something, you spend time with it.

Boom.

Man, she is always so spot on.

If you really, truly love food, spend time with it; take time to connect with your food. Pause before you eat and offer gratitude for the farmers who grew it or raised it, the money you have to purchase it, and the hands that prepared it. So often we forget about the process our food goes through to get from the farm to our fork. If you want to cut down on discomfort later that day, slow down and chew your food thoroughly before taking the next bite. 

7) Take a Digestive Enzyme

If all else fails and you realize you’re not going to follow any of the steps above, give your digestive system some support and take a digestive enzyme. This is kind of like the last-ditch effort. I almost feel like I’m advocating for overeating by putting this one in here, but I also think it could help a lot of people. When we overeat, we put a lot of extra work on our digestive system and don’t have enough enzymes to break down the massive amounts of food we’re eating. Some of my favorite digestive enzyme brands are Rainbow Light, DigestGold, and Garden of Life. You can find them on Vitacost.com.

8) Move Your Body

Moving your body helps stimulate digestion and regulate your blood sugar – something that is usually out of whack due to the amount of food most of us eat on Thanksgiving. 

Start a new family tradition focused on movement. Take a walk Thanksgiving morning for at least 30 minutes and try to do the same after dinner. Find a Turkey Trot 5k in your area on Active.com. Or, if you’re in Baltimore, check out the classes at my favorite place to get movin’…Movement Lab!

Some of Baltimore's Nia community with a few amazing Movement Lab instructors

Dancing with some of Baltimore’s Nia community with a few amazing Movement Lab instructors

Do you have any helpful tips to share to make Thanksgiving more nourishing for your body, mind and soul? Feel free to comment below!

How to Have an Easy Weeknight Dinner Double Date {+ Kitchen Update!}

Are you looking for some ideas to make dinners a little more exciting? If you’re like us, you tend to wait until the weekend to get together with friends around mealtime. But why not change it up and build that into your week?

In today’s post, I’m going to share the steps for planning a no-fuss weeknight dinner date with your friends or family based on a cool experience Bill and I had last week. I hope you’ll be inspired and excited by this idea and feel encouraged to change things up during the week.

Before we dive into that, I have a kitchen update to share! 🙂

We’re about two weeks into our kitchen renovation, and things are coming along nicely. The demo is finished, the floor tiles have been laid, the electric is wired, and the walls are painted. We are going to clean the new flooring properly before our guests come. Friends of ours have recommended Bissell steam cleaners for flooring like ours.

We’re expecting the cabinets to arrive on Tuesday and the whole job to wrap up in about two weeks!

kitchen update.jpg

Versatile Gray is the “Greige” paint color we chose for our kitchen (looks so good!). Aren’t these kitchen towels PERFECT?! And our floor tiles have been laid down and grouted (but not yet cleaned!)

We’ve essentially moved our kitchen to the basement, which happens to be completely finished AND has an extra fridge and sink (serious perk).

Embarking on this basement renovation project has reminded me about the time we found a leak down there! Fortunately, since then we have invested in basement waterproofing techniques to help keep unwanted water out. No one wants a soggy basement after all

While it’s not the most convenient set-up, we have just about everything we need to continue to make meals each week using our blender, induction cooktop, and food processor. Surprisingly, the blender is very versatile with what you can make. From soup, to sauces and smoothies, you can do just about anything with one, so we’ve found it important to keep it around.

At the beginning of the construction process, Bill and I thought it would be a neat idea to become dinner crashers while our renovation was being completed, so we weren’t making dinner in the basement every night.

Our friends and family offered to take us in for a meal or two, and it has been so much fun! It’s given us an opportunity to be more social during the week, something we had not prioritized before now. Here’s the process we followed for having an awesome weeknight dinner date!

Step 1: Pick Your Peeps

Last week, we got together with our friends Kiersten and Zach for a dinner double date. They are in the midst of their own transition, as they’re in the final weeks of preparation leading up to their April 30th wedding. They’re foodies like us and appreciate a wholesome, nourishing meal, so we thought we’d bring the ingredients to them and make the meal together for a weeknight dinner double date!

group shot.jpg

With our lovely hosts (bride and goom-to-be!) after our delicious meal

Step 2: Choose Your Meal & Shop (from Home!)

I’ve had the opportunity to partner with Relay Foods, a healthy online grocery store that carries everything from organic, local produce to pantry staples, snacks, treats, and even personal care products like soaps, shampoo and lotions.

They have a cool Meal Planning feature on their website that lets you search for recipes by category – One Pot Meals, Gluten-Free, Vegan, Paleo, Dairy-Free, 30 Minutes or Less, etc. You can just use it as its own recipe search and use your own ingredients, but if you want to streamline the whole process, click “Add to Meal Plan and Review” when you find a recipe you like. Your cart will automatically update with the ingredients needed for the meal.

We chose to make this Black Bean Soup with Kale Slaw. The cost of all ingredients for a full dinner plus leftovers for four people was about $30. Depending on where we go out to eat, a single dinner and tip can cost that much…for one person! Also, cooking once and eating twice makes meal planning more doable and less intimidating because you’re saving money and time.

relay foods bag .jpg

IMG_4516

Black Bean Soup with Kale Slaw recipe here

Step 3: Pick Up Your Grub (or Have Them Delivered!)

My husband, Bill, was on spring break last week, so he picked up our bags at a nearby pick-up site, but you have the option for Relay to deliver to your house an unlimited number of times each month for $19/month.

Want to try out Relay Foods? Click here to save $20 on your first order of $60 or more.).

Step 4: Make the Meal & Enjoy!

The day of our pick-up, I got an email from Relay that contained the full recipe we were making that night, so once we arrived at Kiersten’s house, we gave everyone a task to do to make the meal come together. We chopped, diced, shredded, and sauteed the ingredients for this warm, grounding soup topped with a bright, refreshing, perfect-for-spring slaw.
This meal was rich in GBOMBS, which are some of the most nourishing, protective, and healing foods on the planet; food like kale, red and yellow onions, garlic, cabbage, and black beans. That is a recipe for whole body nourishment!

Here is the link to get the full recipe for the Black Bean Soup with Kale Slaw. Try putting a few slices of avocado on top for some creaminess!

bill tasting soup

Bill tasting the soup and preparing the colorful kale slaw!

Even though I personally LOVE the idea of going to the grocery store, sometimes I’d rather order my groceries from home. If you’re one of those people who gets anxious at the thought of stepping foot in a crowded store, then I’d recommend giving Relay a try.

Also, because you’re auto-populating your grocery list based on ingredients in the meals you select, you will only be buying what you need, which makes you less likely to waste food and more likely to save money!

I also ordered a small gift for the bride-to-be that she was excited to receive – a bag of Hudson Henry Granola and a box of Numi chamomile lemon organic tea.

gifts

If you’re making a dinner for friends or family for a special occasion or just as an excuse to hang out, it’s nice to bring a small gift along, especially when it’s in the form of food.

If you want to host a weeknight dinner date and are curious about trying Relay Foods as an option, follow this link to get $20 off your first order of $60 or more.

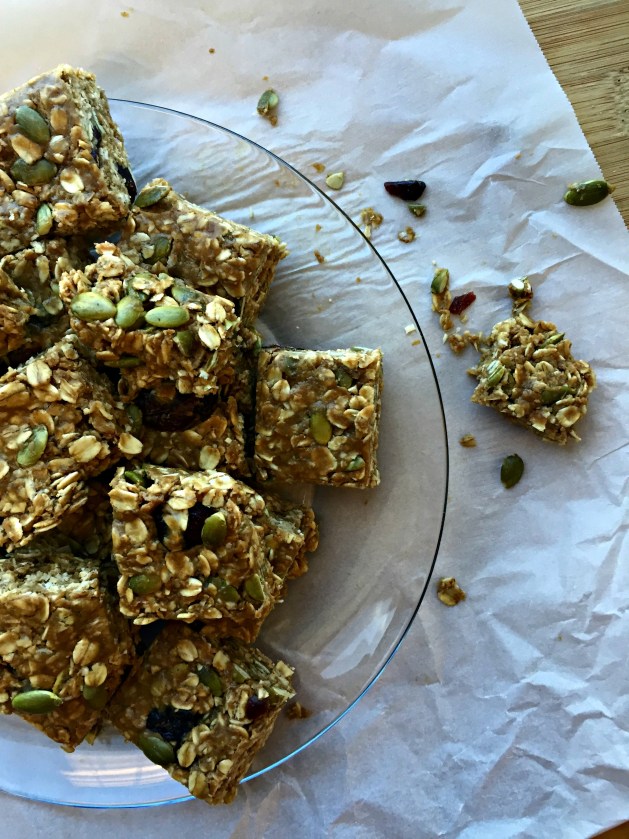
Sunny Cran-ola Bars {No-Bake, Nut-Free, Gluten-Free}

One of my coworkers has peanut, tree nut and coconut allergies, so I challenged myself to make something she could enjoy along with everyone else for a cooking demo I taught today at work.

That’s how these bars came to be.

They’re slightly sweet, salty, tart, crunch and chewy – lots of tastes and textures to keep your taste buds happy!

bars on plate

The main ingredient is sunflower seed butter, which is where this recipe gets its “sunny” name. I’ve written about Sunbutter in a previous post here. You can find it at any grocery store (often in the natural food aisle) and at Target and Walmart. Target sells it in single serve to go packets, which is super convenient.

I shared a variation of this recipe back in the fall for a healthy snacks for kids cooking class but changed it up a little bit, so you wouldn’t need a food processor to make it. I also swapped out cranberries for raisins and used less sweetener overall.

This recipe comes together in about 5-7 minutes, so it’s easy to make in a pinch for an energizing snack!

cran cover

Yield: 20-24 squares

Ingredients

  • 3 cups whole rolled oats (I love Bob’s Red Mill Gluten-Free brand)
  • 2 teaspoons cinnamon
  • Heaping 1/4 teaspoon fine grain sea salt
  • 1/2 cup pumpkin seeds
  • 1/3 cup dried cranberries
  • 1 cup sunflower seed butter (or peanut butter)
  • 1/3 cup + 1 tablespoon honey (add more if you want sweeter)
  • 1 teaspoon vanilla extract
  • Water, as needed

Directions

  1. Line an 8 x 8 pan with parchment paper. Combine oats, cinnamon, sea salt, pumpkin seeds and cranberries in a medium bowl and set aside.
  2. In a small saucepan, heat sunflower seed butter and honey on medium-low, stirring until smooth. Remove from heat and stir in vanilla.
  3. Pour liquid over oats and stir with a spoon or your hands to combine. If it’s too try, add water, 1 tablespoon at a time until it sticks. Once everything comes together, press mixture into lined pan, using the back of a spatula or excess parchment paper to press it down and flatten the top.
  4. Refrigerate for at least an hour to set. Lift parchment from pan and cut into squares. Store in the refrigerator.

Page 1 of 3

Powered by WordPress & Theme by Anders Norén